前言
在 自建vue组件 air-ui (14) -- 打包构建(dev 和 dist) 我们已经知道 air-ui 的 dev 构建 和 dist 构建。 接下来我们讲一下为啥还需要一个 pub 的构建任务,以及这个任务是用来干啥的。
直接将 master 分支作为第三方库拉取的分支
假设我们没有 pub 任务。直接就使用 dist 构建生成 lib 目录,然后将代码提交到 master 分支,并且用 master 打了一个 tag。
这时候我们就可以在某一个项目上用这种方式去加载 air-ui:1
"air-ui": "git+ssh://git@gitlab.xxx.com:web/vue-ui.git#v0.0.4",
然后我们很顺利引用了:1
2
3
4import AirUI from 'air-ui';
import 'air-ui/lib/styles/index.css';
Vue.use(AirUI);
结果编译的时候,报错了:1
2
3ERROR in ./node_modules/air-ui/lib/styles/index.css (./node_modules/css-loader/dist/cjs.js??ref--2-1!./node_modules/postcss-loader/src!./node_modules/air-ui/lib/styles/index.css)
Module build failed (from ./node_modules/postcss-loader/src/index.js):
Error: Loading PostCSS Plugin failed: Cannot find module 'postcss-import'
发现是 air-ui 目录下的 .postcssrc.js 导致的, 因为编译的时候, vue 如果发现有这个文件存在的话,会进行 postcss 的处理。当我把 air-ui 目录下的.postcssrc.js 文件删掉的时候,就正常了。 也就是说 air-ui 在作为第三方库加载的时候,不需要那么多乱七八糟的文件,只要有 lib 目录就够了,其他文件都不需要。
所以这时候就涉及到另一个问题: 那就是项目的开发环境的目录结构和当做第三方包被下载的目录结构是不同的,以 element-ui 来说, 他的项目的 master 分支是这样子的:
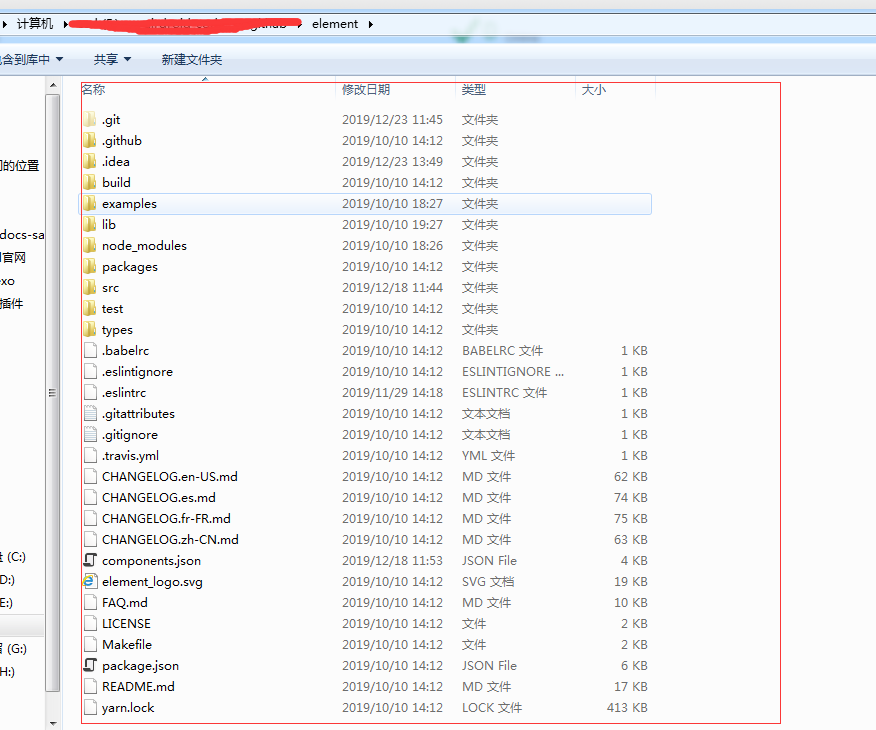
文件还是很多的, 但是如果是作为第三方库被下载下来,就只剩下这样子了:
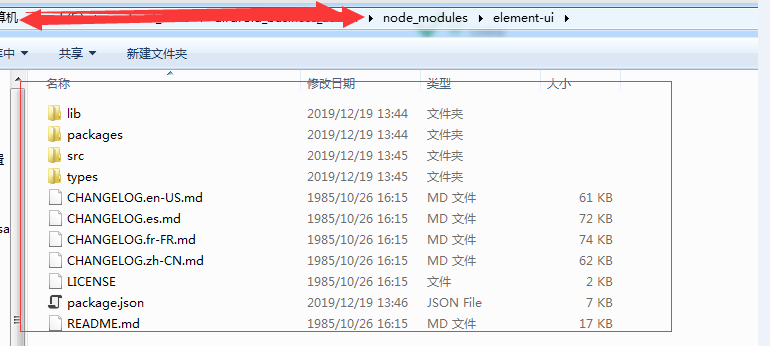
所以可以肯定这两个就不是同一个分支。 因为文件就不一样。 所以 air-ui 也要这么做,把一些不用的,或者是只在dev环境下才有的去掉,只保留核心的用于第三方库的文件。
master-release 分支
现在的 air-ui 被依赖的时候,下载的时候,就是 master 分支的所有的文件, 这样其实是不对的。不需要这么多的文件,其实只需要 lib 文件和 package.json, readme 这三个文件即可。
最简单的方式,就是再创建一个分支,master-release 分支,然后将打包后的 lib 目录, package.json, readme 这三个文件,放到这个分支中,然后再从这个分支打 tag 就可以了。 后面如果拉这个 tag 就是这个分支的内容。
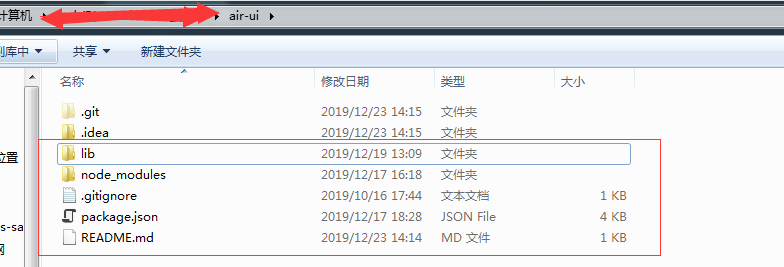
master-release 分支只剩下这一些文件。 其他不必要的文件全部删掉了。 然后再从这个分支打 tag,弄一个新的版本。 然后重新在宿主项目再更新这个新的版本:

这时候下载下来的文件就对了。 只保留需要被引用的文件,其他不需要的文件全部不要。 而且编译也没有问题。
用脚本来处理
但是这样的一个问题就是,每次我要更新版本的时候,都要在 master 分支进行 yarn dist 打包,然后将 lib 目录复制到 master-release 分支,最后在 master-release 分支上打一个 tag。 就会变得很麻烦。 所以解决办法就是将这个过程变成一个任务,然后将 git 的操作,变成一个 shell 脚本来处理,就跟 element-ui 一样, 可以用 shell 脚本来做,比如 yarn pub 这个任务, 那么这个任务就包含以下操作:
- 检查当前分支是否是远程的
master分支,如果不是,返回错误 - 执行
yarn dist, 生成 lib 目录 - 将 lib 目录保存到一个 git ignore 的一个目录
lib_tmp commit and push master分支 (如果 status 有改变的话)- 切换到
master-release分支,将lib_tmp的文件覆盖 lib 目录 commit and push master-release分支master-release打 tag- 把临时文件
lib_tmp删掉
所以我们新建一个文件 build/git-release.sh 来处理一些 git 的操作,内容如下(前提就是开发环境已经存在 master 和 master-release 分支的代码):1
2
3
4
5
6
7
8
9
10
11
12
13
14
15
16
17
18
19
20
21
22
23
24
25
26
27
28
29
30
31
32#!/usr/bin/env sh
echo "start publish version: "$1
if test "$(git rev-parse --abbrev-ref HEAD)" == "master";
then
echo "current branch is master"
echo "start commit and push master"
git add -A
git commit -m "[master build] "$1
git push origin
echo "push success"
echo "copy master lib to lib_tmp"
mkdir lib_tmp
cp -rf lib/* lib_tmp
echo "check branch master-release"
git checkout master-release
echo "copy lib_tmp to master-release lib"
cp -rf lib_tmp/* lib
echo "start commit and push master-release"
git add -A
git commit -m "[master-release build] "$1
git push origin
echo "push master-release success"
echo "create tag...."
git tag -a $1 -m "version "$1
git push origin $1
echo "push tag success"
echo "remove lib_tmp"
rm -rf lib_tmp
else
echo "current branch is not master"
exit 128;
fi
执行的指令是 yarn pub: (因为我的开发环境是 windows,所以这边执行 .sh 文件,前面不用加 sh 指令)1
"pub": "npm run dist && build/git-release.sh v0.0.20",
执行的 log 如下:1
2
3
4
5
6
7
8
9
10
11
12
13
14
15
16
17
18
19
20
21
22
23
24
25
26
27
28
29
30
31
32
33
34
35
36
37
38
39
40
41
42
43
44
45
46
47
48
49
50
51start publish version: v0.0.20
current branch is master
start commit and push master
warning: LF will be replaced by CRLF in lib/air-ui.common.js.
The file will have its original line endings in your working directory.
warning: LF will be replaced by CRLF in package.json.
The file will have its original line endings in your working directory.
warning: LF will be replaced by CRLF in src/components/index.js.
The file will have its original line endings in your working directory.
[master e6d5770] [master build] v0.0.20
3 files changed, 4 insertions(+), 4 deletions(-)
Counting objects: 8, done.
Delta compression using up to 4 threads.
Compressing objects: 100% (8/8), done.
Writing objects: 100% (8/8), 703 bytes | 703.00 KiB/s, done.
Total 8 (delta 7), reused 0 (delta 0)
To gitlab.xxx.com:web/air-ui.git
9690368..e6d5770 master -> master
push success
copy master lib to lib_tmp
check branch master-release
Checking out files: 100% (929/929), done.
Switched to branch 'master-release'
Your branch is up to date with 'origin/master-release'.
copy lib_tmp to master-release lib
start commit and push master-release
warning: LF will be replaced by CRLF in lib/air-ui.common.js.
。。。。
The file will have its original line endings in your working directory.
[master-release f576e93] [master-release build] v0.0.20
1 file changed, 1 insertion(+), 1 deletion(-)
Counting objects: 4, done.
Delta compression using up to 4 threads.
Compressing objects: 100% (4/4), done.
Writing objects: 100% (4/4), 412 bytes | 412.00 KiB/s, done.
Total 4 (delta 3), reused 0 (delta 0)
remote:
remote: To create a merge request for master-release, visit:
remote: http://gitlab.xxx.com/web/air-ui/merge_requests/new?merge_request%5Bsource_branch%5D=master-release
remote:
To gitlab.xxx.com:web/air-ui.git
ce49143..f576e93 master-release -> master-release
push master-release success
create tag....
Counting objects: 1, done.
Writing objects: 100% (1/1), 160 bytes | 160.00 KiB/s, done.
Total 1 (delta 0), reused 0 (delta 0)
To gitlab.xxx.com:web/air-ui.git
* [new tag] v0.0.20 -> v0.0.20
push tag success
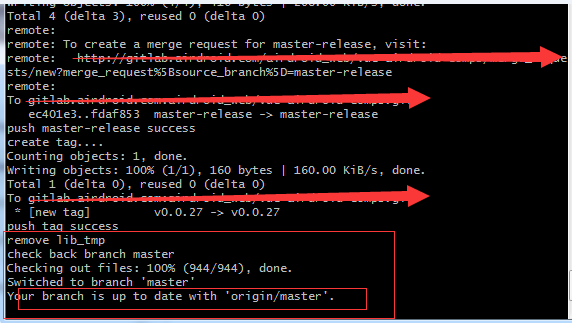
remove lib_tmp
从提交 log 的来看, 确实这两个分支都 push 上去了,并且打 tag 了:

这边需要注意一点的是 lib_tmp 这个目录是存放 lib 的临时目录,虽然最后会被删掉,但是最好在 master 和 master-release 分支将其设置为 git 的 .ignore 文件中。
而且这边还有个弊端,就是我每次执行 yarn pub 的时候,都要手动修改 git-release.sh 这个指令后面的版本号。而且 components/index.js 中的 版本号,也要手动对应修改,还不够智能。
重新切回 master 分支有问题
而且还有一个问题,像上面那个操作,就会变成最后都会切换到 master-release 分支,每次还要手动切换成master 分支。也是很麻烦。之前有试过在 git-release.sh 中最后将其切回 master 分支:1
2
3
4
5...
rm -rf lib_tmp
echo "check back branch master"
git checkout master
...
但是最后报错了:1
2
3
4
5...
push tag success
remove lib_tmp
check back branch master
error: cannot stat 'build/git-release.sh': Permission denied
最后报错了,这个是因为切换到 master-release 的分支的时候, 这个目录已经没有 build/git-release.sh 这个文件了,也就导致了这个错误。所以如果要切回来,我们应该要保证切到 master-release 的分支的时候, build/git-release.sh 这个文件还存在。 这样就可以了。
再优化-改成交互式的方式
因为每次执行 pub 任务的时候,都要在 pub 指令和 components/index.js 手动修改版本号。这个就很麻烦。 所以我们要优化一下, 全部用 gulp 来实现,包括执行 shell 文件的时候,要做到以下效果:
- 刚开始要有交互界面,需要输入版本号,要校验规则:
- 替换
components/index.js下面的版本号 - 打
dist包 - 执行 shell 脚本 (用 node 执行带参数)
- 最后切换为
master分支
具体 gulp 代码如下:1
2
3
4
5
6
7
8
9
10
11
12
13
14
15
16
17
18
19
20
21
22
23
24
25
26
27
28
29
30
31
32
33
34
35
36
37
38
39
40
41
42
43
44
45
46
47
48
49
50
51
52
53
54
55
56
57
58
59
60
61
62
63
64
65
66
67
68
69//============= pub 构建 start ===========
var seq = require("gulp-sequence");
var replace = require("gulp-replace");
var rename = require('gulp-rename');
var del = require('del');
var prompt = require('gulp-prompt');
const childProcess = require('child_process');
var tagVersion = '';
// 输入版本号
gulp.task('pubVersion', cb => {
return gulp.src('./src/components/index.js')
.pipe(prompt.prompt({
type: 'input',
name: 'version',
message: 'input your tag version (like v0.0.x)?',
validate: function(version){
// 这边要进行正则验证
return /^v\d+.\d+.\d+$/.test(version);
}
}, function(res){
console.log("version:" + res.version);
tagVersion = res.version;
}))
.pipe(replace(/version:(.+),/g, function(match, p1, p2){
return `version: '${tagVersion}',`
}))
.pipe(gulp.dest('./src/components'));
});
// 接下来就开始打 dist
gulp.task('pubDist', function (cb) {
var workerProcess = childProcess.exec('npm run dist', {
cwd: './'
}, cb);
workerProcess.stdout.on('data', function (data) {
console.log(data);
});
workerProcess.stderr.on('data', function (data) {
console.log('stderr: ' + data);
});
});
// 接下来执行将 build/git-release.sh 复制到根目录,并重命名(不然后面会切不回来)
gulp.task('pubCopyShell', function() {
return gulp.src('./build/git-release.sh')
.pipe(rename('git-release-tmp.sh'))
.pipe(gulp.dest('./'));
});
// 接下来执行这个 shell 指令
gulp.task('pubDoShell', function (cb) {
var workerProcess = childProcess.exec(`git-release-tmp.sh ${tagVersion}`, {
cwd: './'
}, cb);
workerProcess.stdout.on('data', function (data) {
console.log(data);
});
workerProcess.stderr.on('data', function (data) {
console.log('stderr: ' + data);
});
});
// 最后将这个临时的 shell 文件删除
gulp.task('pubDelTempShell', cb => {
return del([
'./git-release-tmp.sh'
], cb);
});
gulp.task('pub', seq('pubVersion', 'pubDist', 'pubCopyShell', 'pubDoShell', 'pubDelTempShell'));
//============= pub 构建 end ===========
可以看到,因为我后面执行的是一个临时的 sh 文件: git-release-tmp.sh。 所以后面可以切回来 master 分支了。
而且这个是有交互模式的,允许我们输入规则为 v.x.x.x 的版本号, 具体的 log 如下:1
2
3
4
5
6
7
8
9
10
11
12
13
14
15
16
17
18
19
20
21
22
23
24
25
26
27
28
29
30
31
32
33
34
35
36
37
38
39
40
41
42
43
44
45
46
47
48
49
50
51
52
53
54
55
56
57
58
59
60
61
62
63
64
65
66
67
68
69
70
71
72
73
74
75
76
77
78
79
80
81
82
83
84
85
86
87
88
89
90
91
92
93
94
95
96
97
98
99
100
101
102
103
104
105
106
107
108
109
110
111
112
113
114
115
116
117
118
119
120
121
122
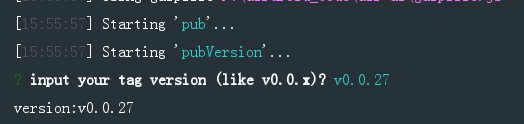
123F:\code\air-ui>gulp pub
[15:55:57] Using gulpfile F:\code\air-ui\gulpfile.js
[15:55:57] Starting 'pub'...
[15:55:57] Starting 'pubVersion'...
? input your tag version (like v0.0.x)? v0.0.27
version:v0.0.27
[15:56:02] Finished 'pubVersion' after 4.6 s
[15:56:02] Starting 'pubDist'...
> air-ui@1.0.0 dist F:\code\air-ui
> npm run clean && webpack --config build/webpack.common.js && webpack --config build/webpack.component.js && npm run css && npm run lang && npm run theme
> air-ui@1.0.0 clean F:\code\air-ui
> rimraf lib && rimraf test/**/coverage
Hash: c3c11a0506830b38e6f8
Version: webpack 3.12.0
Time: 12278ms
Asset Size Chunks Chunk Names
air-ui.common.js 1.29 MB 0 [emitted] [big] app
[1] ./src/utils/util.js 7.4 kB {0} [built]
...
+ 468 hidden modules
> air-ui@1.0.0 css F:\code\air-ui
> gulp buildCss
Using gulpfile F:\code\air-ui\gulpfile.js
[15:56:34]
Starting 'compile'...
[15:56:34]
Starting 'copyfont'...
[15:56:34]
Finished 'copyfont' after 315 ms
[15:56:41] Finished 'compile' after 7.06 s
[15:56:41] Starting 'buildCss'...
[15:56:41] Finished 'buildCss' after 40 μs
> air-ui@1.0.0 lang F:\code\air-ui
> gulp copylang
[15:56:44]
Using gulpfile F:\code\air-ui\gulpfile.js
[15:56:44]
Starting 'copylang'...
[15:56:44]
Finished 'copylang' after 279 ms
> air-ui@1.0.0 theme F:\code\air-ui
> gulp theme
[15:56:46]
Using gulpfile F:\code\air-ui\gulpfile.js
[15:56:46]
Starting 'theme'...
[15:56:46]
Starting 'del-old-theme'...
[15:56:47]
Finished 'del-old-theme' after 37 ms
[15:56:47] Starting 'biz-theme'...
[15:56:47] Starting 'biz-theme-copy'...
[15:56:47]
Finished 'biz-theme-copy' after 576 ms
[15:56:47] Starting 'biz-theme-replace'...
[15:56:47]
Finished 'biz-theme-replace' after 16 ms
[15:56:47] Starting 'biz-theme-compile'...
[15:56:59]
Finished 'biz-theme-compile' after 12 s
[15:56:59] Starting 'biz-theme-font'...
[15:56:59]
Finished 'biz-theme-font' after 12 ms
[15:56:59] Finished 'biz-theme' after 12 s
[15:56:59] Starting 'personal-theme'...
[15:56:59] Starting 'personal-theme-copy'...
[15:56:59]
Finished 'personal-theme-copy' after 481 ms
[15:56:59] Starting 'personal-theme-replace'...
[15:56:59]
Finished 'personal-theme-replace' after 8 ms
[15:56:59] Starting 'personal-theme-compile'...
[15:57:08] Finished 'personal-theme-compile' after 8.54 s
[15:57:08] Starting 'personal-theme-font'...
[15:57:08]
Finished 'personal-theme-font' after 12 ms
[15:57:08] Finished 'personal-theme' after 9.04 s
[15:57:08] Starting 'del-theme-tmp'...
[15:57:08] Finished 'del-theme-tmp' after 129 ms
[15:57:08] Finished 'theme' after 21 s
[15:57:08] Finished 'pubDist' after 1.1 min
[15:57:08] Starting 'pubCopyShell'...
[15:57:08] Finished 'pubCopyShell' after 9.44 ms
[15:57:08] Starting 'pubDoShell'...
[15:57:44] Finished 'pubDoShell' after 36 s
[15:57:44] Starting 'pubDelTempShell'...
[15:57:44] Finished 'pubDelTempShell' after 16 ms
[15:57:44] Finished 'pub' after 1.78 min
这样就完美了。 指令改成:1
"pub": "gulp pub",
再优化 - 修改 package.json 的版本号
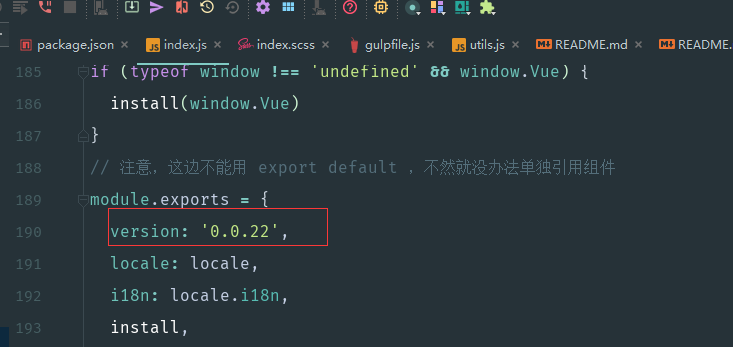
后面发现还有一个细节还可以再优化, package.json 的 version 其实并没有变过来??
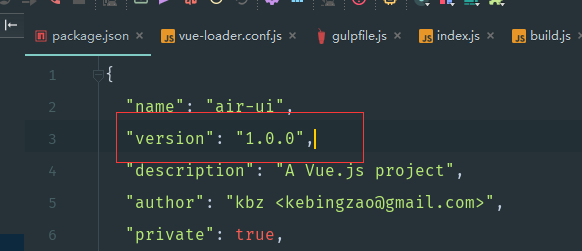
还是一直是 1.0.0, 还是得处理一下。 所以还得再加上这个的处理,并且切换到 master-release 的时候,也要替换掉这个分支的 package.json 文件, 这样子这两个分支的 package.json 就会保持一致:
所以 gulp 还要再加上这两个任务:1
2
3
4
5
6
7
8
9
10
11
12
13gulp.task('pubPackageVersion', cb => {
return gulp.src('./package.json')
.pipe(replace(/"version":(.+),/g, function(match, p1, p2){
return `"version": "${tagVersion.substring(1,tagVersion.length)}",`
}))
.pipe(gulp.dest('./'));
});
// 拷贝 package.json 到临时文件
gulp.task('pubCopyPackage', function() {
return gulp.src('./package.json')
.pipe(rename('package-tmp.json'))
.pipe(gulp.dest('./'));
});
而且 git-release.sh 也要加上 覆盖 package.json 的操作:1
2echo "copy package-tmp.json to master-release package.json"
cp -rf package-tmp.json package.json
然后 .ignore 文件还要把这个 package-tmp.json 给忽略掉。(master 和 master-release 都设置)。 然后最后执行一下,然后看下效果,
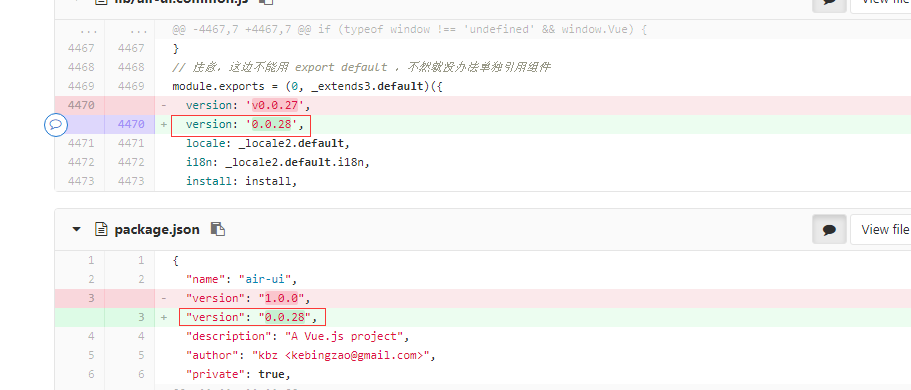
看一下提交记录:
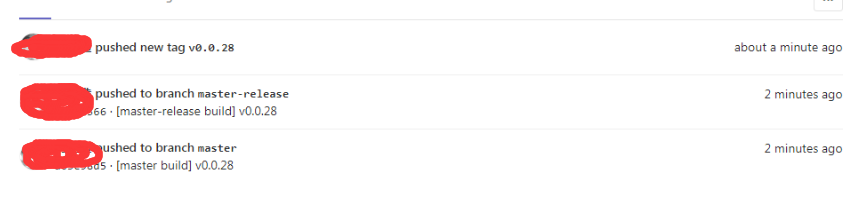
看一下 master 的提交记录,三个地方的 version 都改了:
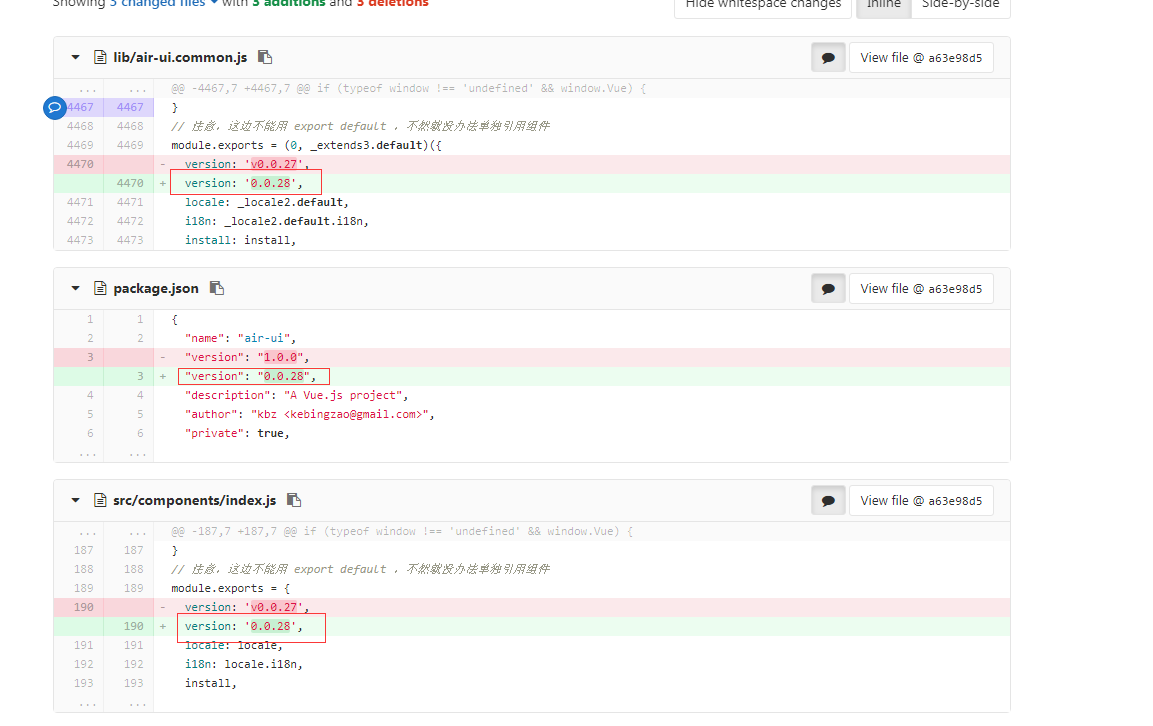
看 master-release 的提交记录, 两个地方的 version 都改了:
这样就完成了。 最后完整的代码如下, gulp 任务的代码:1
2
3
4
5
6
7
8
9
10
11
12
13
14
15
16
17
18
19
20
21
22
23
24
25
26
27
28
29
30
31
32
33
34
35
36
37
38
39
40
41
42
43
44
45
46
47
48
49
50
51
52
53
54
55
56
57
58
59
60
61
62
63
64
65
66
67
68
69
70
71
72
73
74
75
76
77
78
79
80
81
82
83
84
85
86
87
88
89
90
91
92
93
94
95
96
97
98
99
100var seq = require("gulp-sequence");
var replace = require("gulp-replace");
var rename = require('gulp-rename');
var del = require('del');
var prompt = require('gulp-prompt');
const childProcess = require('child_process');
/** os是否是windows */
const isWin = /^win/.test(process.platform);
//============= pub 构建 start ===========
var tagVersion = '';
// 输入版本号
gulp.task('pubVersion', cb => {
return gulp.src('./src/components/index.js')
.pipe(prompt.prompt({
type: 'input',
name: 'version',
message: 'input your tag version (like v0.0.x)?',
validate: function (version) {
// 这边要进行正则验证
return /^v\d+.\d+.\d+$/.test(version);
}
}, function (res) {
console.log("version:" + res.version);
tagVersion = res.version;
}))
.pipe(replace(/version:(.+),/g, function (match, p1, p2) {
return `version: '${tagVersion.substring(1, tagVersion.length)}',`
}))
.pipe(gulp.dest('./src/components'));
});
// 接下来就开始打 dist
gulp.task('pubDist', function (cb) {
var workerProcess = childProcess.exec('npm run dist', {
cwd: './'
}, cb);
workerProcess.stdout.on('data', function (data) {
console.log(data);
});
workerProcess.stderr.on('data', function (data) {
console.log('stderr: ' + data);
});
});
// 接下来连同 package.json 里面的 version 一起改一下:
gulp.task('pubPackageVersion', cb => {
return gulp.src('./package.json')
.pipe(replace(/"version":(.+),/g, function (match, p1, p2) {
return `"version": "${tagVersion.substring(1, tagVersion.length)}",`
}))
.pipe(gulp.dest('./'));
});
// 拷贝 package.json 到临时文件
gulp.task('pubCopyPackage', function () {
return gulp.src('./package.json')
.pipe(rename('package-tmp.json'))
.pipe(gulp.dest('./'));
});
// 接下来执行将 build/git-release.sh 复制到根目录,并重命名(不然后面会切不回来)
gulp.task('pubCopyShell', function () {
return gulp.src('./build/git-release.sh')
.pipe(rename('git-release-tmp.sh'))
.pipe(gulp.dest('./'));
});
// 接下来执行这个 shell 指令
gulp.task('pubDoShell', function (cb) {
var workerProcess = childProcess.exec(`${isWin ? '' : 'sh'} git-release-tmp.sh ${tagVersion}`, {
cwd: './'
}, cb);
workerProcess.stdout.on('data', function (data) {
console.log(data);
});
workerProcess.stderr.on('data', function (data) {
console.log('stderr: ' + data);
});
});
// 最后将这个临时文件删除
gulp.task('pubDelTemp', cb => {
return del([
'./git-release-tmp.sh',
'./package-tmp.json'
], cb);
});
gulp.task('pub', seq(
'pubVersion',
'pubDist',
'pubPackageVersion',
'pubCopyPackage',
'pubCopyShell',
'pubDoShell',
'pubDelTemp'
));
//============= pub 构建 end ===========
git-release.sh 的代码如下:1
2
3
4
5
6
7
8
9
10
11
12
13
14
15
16
17
18
19
20
21
22
23
24
25
26
27
28
29
30
31
32
33
34
35
36
37#!/usr/bin/env sh
echo "start publish version: "$1
if test "$(git rev-parse --abbrev-ref HEAD)" == "master";
then
echo "current branch is master"
echo "start commit and push master"
git add -A
git commit -m "[master build] "$1
git push origin
echo "push success"
echo "copy master lib to lib_tmp"
mkdir lib_tmp
cp -rf lib/* lib_tmp
echo "check branch master-release"
git checkout master-release
echo "copy lib_tmp to master-release lib"
cp -rf lib_tmp/* lib
echo "copy package-tmp.json to master-release package.json"
cp -rf package-tmp.json package.json
echo "start commit and push master-release"
git add -A
git commit -m "[master-release build] "$1
git push origin
echo "push master-release success"
echo "create tag...."
git tag -a $1 -m "version "$1
git push origin $1
echo "push tag success"
echo "remove lib_tmp"
rm -rf lib_tmp
echo "check back branch master"
git checkout master
else
echo "current branch is not master"
exit 128;
fi
指令就是:1
"pub": "gulp pub",
总结
通过 pub 任务,我们实现了以下功能:
- 打包的时候,通过输入 tag 版本号,同时修改
master分支的打包前的components/index.js和package.json文件,打包后的air-ui.common.js中的对应的版本号字段,并提交到线上库 - 并将 lib 目录和
package.json文件同步到master-release分支 master-release提交到线上库,并且打tag- 最后回到原先的
master分支
其实 element-ui 的 pub 任务也是类似的情况,不过它比较复杂,考虑的情况也比较多。air-ui 就不需要考虑那么多情况,相应来说也更好理解。
下一节我们讲一下在做 air-ui 的组件的过程中,遇到的一些奇葩的情况,以及怎么爬坑的。
系列文章:
自建vue组件 air-ui (1) -- 为啥我要自建一个类 element ui 的组件
自建vue组件 air-ui (2) -- 先分析一下 element ui 项目
自建vue组件 air-ui (3) -- css 开发规范
自建vue组件 air-ui (4) -- air-ui 环境搭建和目录结构
自建vue组件 air-ui (5) -- 创建第一个组件 Button
自建vue组件 air-ui (6) -- 创建内置服务组件
自建vue组件 air-ui (7) -- 创建指令组件
自建vue组件 air-ui (8) -- 实现部分引入组件
自建vue组件 air-ui (9) -- 用 vuepress 写文档
自建vue组件 air-ui (10) -- vuepress 写文档 (进阶版)
自建vue组件 air-ui (11) -- vuepress 写文档 (爬坑版)
自建vue组件 air-ui (12) -- 国际化机制
自建vue组件 air-ui (13) -- 国际化机制(进阶版)
自建vue组件 air-ui (14) -- 打包构建(dev 和 dist)
自建vue组件 air-ui (15) -- 主题定制
自建vue组件 air-ui (16) -- 打包构建 pub 任务
自建vue组件 air-ui (17) -- 开发爬坑篇以及总结