前言
本节主要讲一下 air-ui 的打包。 air-ui 的构建主要分为 3 个环境:
- 本地开发环境
dev - 打组件包
dist - 打 pub 包并打 tag
pub
本节主要是讲一下前两种方式, dev 和 dist, 至于最后的 pub 方式,因为遇到的坑比较多,所以会再开一节来讲。
dev 构建
指令是这样子的:1
yarn start
其实 dev 构建没啥好讲的,因为用的是 vue-cli 脚手架搭建的,本来就自带 dev 打包指令:1
"dev": "webpack-dev-server --inline --progress --config build/webpack.dev.conf.js",
我只不过是因为要对 home.vue 这个文件进行一下处理(查看 自建vue组件 air-ui (10) -- vuepress 写文档 (进阶版) 中的优化 homve.vue 的写法),所以才换成用 start 指令:1
"start": "gulp homeVue && npm run dev",
所以本质上 dev 构建根本不需要去调整,直接用默认脚手架带的那种方式就行了。而且首页也只有 home.vue 一个页面。也不需要去进行 vue-router 的管理。
所以 webpack.dev.conf.js 这个文件根本不需要去调整。 除了 webpack.base.conf.js 需要在 resolve 的 alias 加一个这个配置:1
2// 设置根目录为 air-ui, 这个没有设置就不能引用绝对路径
'air-ui': path.resolve(__dirname, '../'),
其他 build 目录自带的文件,都不需要去调整。
关于 eslint
因为用 vue-cli 搭建的脚手架默认会自带 eslint 检查工具。 所以有些时候对于格式会比较严格,所以可以通过 .eslintrc.js 进行一些规则的过滤, 比如我就是在 rules map 里面过滤掉了一些检查:1
2
3
4
5
6
7
8
9
10
11
12
13
14
15
16
17
18
19
20
21
22rules: {
// 不需要检查大括号之前的空格
"template-curly-spacing": 0,
// 不需要检查不需要的 call
"no-useless-call": 0,
// 不需要检查 callback 语法
"no-callback-literal": 0,
// 不需要分析未定义
"no-use-before-define": 0,
// 不需要分析没用的 return
"no-useless-return": 0,
// 不需要分析不必要的转义符
"no-useless-escape": 0,
// 结尾是否加分号都可以
'semi': 0,
// 不要求在方法名和刮号之间需要有一格空格
"space-before-function-paren": 0,
// allow async-await
'generator-star-spacing': 'off',
// allow debugger during development
'no-debugger': process.env.NODE_ENV === 'production' ? 'error' : 'off'
},
当然你也可以直接更粗暴的将 eslint 检查干掉,在 webpack.base.conf.js 中将 module 中的 useEslint 这一行注释掉:1
2
3
4
5
6
7
8module: {
rules: [
// ...(config.dev.useEslint ? [createLintingRule()] : []),
{
test: /\.vue$/,
loader: 'vue-loader',
options: vueLoaderConfig
},
这样就不会触发 eslint 检查了。
而且你如果想要直接对某些文件或者文件夹进行忽略的话,也可以在 .eslintignore 这个文件里面进行忽略:1
2
3
4
5
6
7/build/
/config/
/dist/
/*.js
/test/unit/coverage/
src/utils/popper.js
src/utils/date.js
像我就忽略了以上这些文件(包括两个被我稍作修改的第三方库 popper 和 date),让其不进行 eslint 检查。
dist 构建
dev 构建没啥好说的,接下来我们讲一下 dist 构建,其实就是将 air-ui 组件库文件进行构建,而且是分为两种打包方式:
- 打包成通用的
air-ui.common.js用于全局引入 - 单个组件打包成自己的 js 文件,用于按需加载和引入
接下来我们看下指令:1
"dist": "npm run clean && webpack --config build/webpack.common.js && webpack --config build/webpack.component.js && npm run css && npm run lang && npm run theme",
再申明 dist 的打包的webpack 是 3.x 版本,如果是 4.x 版本的话,不适用,还要再进行调整
主要是分为几个步骤,我们接下来分析:
1.打包前清理
1 | npm run clean |
1 | "clean": "rimraf lib && rimraf test/**/coverage", |
这个主要是打包前进行文件的清理,就是将目标目录 lib 删掉。
2.打包common文件
1 | webpack --config build/webpack.common.js |
接下来就是打包 common 文件。入口文件就是 components/index.js。 具体的 webpack.common.js 代码如下:1
2
3
4
5
6
7
8
9
10
11
12
13
14
15
16
17
18
19
20
21
22
23
24
25
26
27
28
29
30
31
32
33
34
35
36
37
38
39
40
41
42
43
44
45
46
47
48
49
50
51
52
53
54
55
56
57
58
59
60
61
62
63
64
65
66
67
68
69
70
71
72
73
74
75
76
77
78
79
80
81
82
83
84
85
86
87
88
89
90
91
92
93
94
95
96
97const path = require('path');
const webpack = require('webpack');
const ProgressBarPlugin = require('progress-bar-webpack-plugin');
const nodeExternals = require('webpack-node-externals');
module.exports = {
entry: {
app: ['./src/components/index.js']
},
output: {
path: path.resolve(process.cwd(), './lib'),
publicPath: '/dist/',
filename: 'air-ui.common.js',
chunkFilename: '[id].js',
libraryTarget: 'commonjs2'
},
resolve: {
extensions: ['.js', '.vue', '.json'],
alias: {
main: path.resolve(__dirname, '../src'),
'air-ui': path.resolve(__dirname, '../')
},
modules: ['node_modules']
},
// 这边将一些文件不打包进去,不然 common 的体积会变得很大,尤其是语言文件。 不过这样一来的后果就是,如果 common 不包含这些文件的话,那么这些文件就要单独打出来,而且路径还不能变, 而且一旦不打包进去,那么引用就要变成 绝对路径引用,不能再用
externals: [Object.assign({
vue: 'vue'
}, {
'../lang/zh-CN': 'air-ui/lib/lang/zh-CN'
}), nodeExternals()],
module: {
rules: [
{
test: /\.(jsx?|babel|es6)$/,
include: process.cwd(),
exclude: /node_modules|utils\/popper\.js|utils\/date.\js/,
loader: 'babel-loader'
},
{
test: /\.vue$/,
loader: 'vue-loader',
options: {
preserveWhitespace: false
}
},
{
test: /\.json$/,
loader: 'json-loader'
},
{
test: /\.css$/,
loaders: ['style-loader', 'css-loader', 'postcss-loader']
},
{
test: /\.scss$/,
loaders: ['style-loader', 'css-loader', 'sass-loader']
},
{
test: /\.html$/,
loader: 'html-loader?minimize=false'
},
{
test: /\.otf|ttf|woff2?|eot(\?\S*)?$/,
loader: 'url-loader',
query: {
limit: 10000,
name: path.posix.join('static', '[name].[hash:7].[ext]')
}
},
{
test: /\.svg(\?\S*)?$/,
loader: 'url-loader',
query: {
limit: 10000,
name: path.posix.join('static', '[name].[hash:7].[ext]')
}
},
{
test: /\.(gif|png|jpe?g)(\?\S*)?$/,
loader: 'url-loader',
query: {
limit: 10000,
name: path.posix.join('static', '[name].[hash:7].[ext]')
}
}
]
},
plugins: [
new ProgressBarPlugin(),
new webpack.DefinePlugin({
'process.env.NODE_ENV': JSON.stringify('production')
}),
new webpack.LoaderOptionsPlugin({
minimize: true
})
]
};
其实逻辑很简单,就是将 components/index.js 通过打包成 ES6 Module的加载方式,将其打包成 air-ui.common.js 这个文件,并放入 lib 目录。 所以要完整加载 air-ui 这个组件库,其实就是加载 air-ui.common.js,为了保证以下这种方式能索引到这个文件:1
import AirUI from 'air-ui'
所以我们需要在 package.json 加上这个字段:1
"main": "lib/air-ui.common.js",
这时候项目检索 air-ui 这个库的默认引入文件的时候,就会指向 air-ui.common.js 这个文件。
3.各自组件打包
1 | webpack --config build/webpack.component.js |
上面那个任务是打包 common 文件,就是为了完整引入。但是有时候我们也需要实现组件的部分引入,所以也将我们觉得需要的组件也要打包出来,就在根目录的components.json:1
2
3
4
5
6
7
8
9
10{
"locale": "./src/locale/index.js",
"button": "./src/components/button/index.js",
"button-group": "./src/components/button-group/index.js",
"row": "./src/components/row/index.js",
"col": "./src/components/col/index.js",
...中间省略N个组件
"icon": "./src/components/icon/index.js",
...中间省略N个组件
}
我们不需要将所有做的组件都要打包单独导出来,只选择我们觉得后面可能需要会单独引用的组件。 接下来我们看下主要的逻辑 webpack.conponent.js 代码:1
2
3
4
5
6
7
8
9
10
11
12
13
14
15
16
17
18
19
20
21
22
23
24
25
26
27
28
29
30
31
32
33
34
35
36
37
38
39
40
41
42
43
44
45
46
47
48
49
50
51
52
53
54
55
56
57
58
59
60
61
62
63
64
65
66
67
68
69
70
71
72
73
74
75
76
77
78
79
80
81
82
83
84
85
86
87
88
89
90
91
92
93
94
95
96
97
98
99
100
101
102const path = require('path');
const webpack = require('webpack');
const ProgressBarPlugin = require('progress-bar-webpack-plugin');
// 分别构建各自的组件,用来做单独引用模式
const Components = require('../components.json');
const nodeExternals = require('webpack-node-externals');
const webpackConfig = {
entry: Components,
output: {
path: path.resolve(process.cwd(), './lib'),
publicPath: '/dist/',
filename: '[name].js',
chunkFilename: '[id].js',
libraryTarget: 'commonjs2'
},
resolve: {
extensions: ['.js', '.vue', '.json'],
alias: {
main: path.resolve(__dirname, '../src'),
'air-ui': path.resolve(__dirname, '../')
},
modules: ['node_modules']
},
// 这边将一些文件不打包进去,不然 common 的体积会变得很大,尤其是语言文件。 不过这样一来的后果就是,如果 common 不包含这些文件的话,那么这些文件就要单独打出来,而且路径还不能变, 而且一旦不打包进去,那么引用就要变成 绝对路径引用,不能再用
externals: [Object.assign({
vue: 'vue'
}, {
'../lang/zh-CN': 'air-ui/lib/lang/zh-CN',
// 这边注意,只有在打包单独组件的时候,才需要进行 locale 的路径替换,因为单独加载组件,也需要多语言的支持,如果是打包common,那么就不需要,因为都集成了
'../../../../src/locale': 'air-ui/lib/locale',
'../locale': 'air-ui/lib/locale',
}), nodeExternals()],
module: {
rules: [
{
test: /\.(jsx?|babel|es6)$/,
include: process.cwd(),
exclude: /node_modules|utils\/popper\.js|utils\/date.\js/,
loader: 'babel-loader'
},
{
test: /\.vue$/,
loader: 'vue-loader',
options: {
preserveWhitespace: false
}
},
{
test: /\.json$/,
loader: 'json-loader'
},
{
test: /\.css$/,
loaders: ['style-loader', 'css-loader', 'postcss-loader']
},
{
test: /\.scss$/,
loaders: ['style-loader', 'css-loader', 'sass-loader']
},
{
test: /\.html$/,
loader: 'html-loader?minimize=false'
},
{
test: /\.otf|ttf|woff2?|eot(\?\S*)?$/,
loader: 'url-loader',
query: {
limit: 10000,
name: path.posix.join('static', '[name].[hash:7].[ext]')
}
},
{
test: /\.svg(\?\S*)?$/,
loader: 'url-loader',
query: {
limit: 10000,
name: path.posix.join('static', '[name].[hash:7].[ext]')
}
},
{
test: /\.(gif|png|jpe?g)(\?\S*)?$/,
loader: 'url-loader',
query: {
limit: 10000,
name: path.posix.join('static', '[name].[hash:7].[ext]')
}
}
]
},
plugins: [
new ProgressBarPlugin(),
new webpack.DefinePlugin({
'process.env.NODE_ENV': JSON.stringify('production')
}),
new webpack.LoaderOptionsPlugin({
minimize: true
})
]
};
module.exports = webpackConfig;
跟打 common 文件差不多,只不过入口文件是 components.json 里面的组件。所以生成的就是对应组件的 js 文件。
4.打包 css
1 | npm run css |
1 | "css": "gulp buildCss", |
这个一个 gulp 任务,逻辑也很简单,就是 生成 css 之后,移到 lib/style 目录:1
2
3
4
5
6
7
8
9
10
11
12
13
14
15
16
17
18
19
20var sass = require('gulp-sass');
var autoprefixer = require('gulp-autoprefixer');
var cssmin = require('gulp-cssmin');
gulp.task('compile', function () {
return gulp.src('./src/styles/*.scss')
.pipe(sass.sync())
.pipe(autoprefixer({
cascade: false
}))
.pipe(cssmin())
.pipe(gulp.dest('./lib/styles'));
});
gulp.task('copyfont', function () {
return gulp.src('./src/styles/fonts/**')
.pipe(gulp.dest('./lib/styles/fonts'));
});
gulp.task('buildCss', ['compile', 'copyfont']);
5.打包语言文件
1 | npm run lang |
1 | "lang": "gulp copylang", |
这个也是一个 gulp 任务,也是将 src/lang 移到 lib/lang 目录即可:1
2
3
4gulp.task('copylang', function () {
return gulp.src('./src/lang/**')
.pipe(gulp.dest('./lib/lang'));
});
6.打包主题文件
1 | npm run theme |
1 | "theme": "gulp theme", |
这个也是一个 gulp 任务:1
2
3
4
5
6
7
8
9
10
11
12
13
14
15
16
17
18
19
20
21
22
23
24
25
26
27
28
29
30
31
32
33
34
35
36
37
38
39
40
41
42
43
44
45
46
47
48
49
50
51
52
53
54
55
56
57
58
59
60
61
62
63
64
65
66
67var themeMapTaskList = {};
var initThemeMap = function () {
// 先删除旧的主题
themeMapTaskList['del-old-theme'] = gulp.task('del-old-theme', cb => {
return del([
'./lib/theme'
], cb);
});
// 读取当前的所有的主题的文件
var files = fs.readdirSync(path.resolve(`src/theme/`));
//遍历读取到的文件列表
files.forEach(function (filename) {
console.log(filename);
var fileStr = fs.readFileSync(path.resolve(`src/theme/${filename}`));
var tempMap = {};
fileStr.toString().replace(/(.+):(.+);/g, function (match, p1, p2) {
tempMap[p1.trim()] = p2.trim();
});
var themeName = filename.split(".")[0];
console.log(`${themeName}:` + JSON.stringify(tempMap));
var tmpTaskList = {};
// 首先将旧的 copy 一份过去
tmpTaskList[`${themeName}-theme-copy`] = gulp.task(`${themeName}-theme-copy`, function () {
return gulp.src('./src/styles/**')
.pipe(gulp.dest(`./lib/theme/tmp/${themeName}`));
});
// 替换 var 里面的内容
tmpTaskList[`${themeName}-theme-replace`] = gulp.task(`${themeName}-theme-replace`, function () {
return gulp.src(`./lib/theme/tmp/${themeName}/common/var.scss`)
.pipe(replace(/(.+):(.+);/g, function (match, p1, p2) {
p1 = p1.trim();
if (tempMap[p1]) {
console.log(`theme replace: key: ${p1}, before: ${p2}, after: ${tempMap[p1]}`);
return `${p1}: ${tempMap[p1]}`
}
return match;
}))
.pipe(gulp.dest(`./lib/theme/tmp/${themeName}/common`));
});
// 重新生成 css
tmpTaskList[`${themeName}-theme-compile`] = gulp.task(`${themeName}-theme-compile`, function () {
return gulp.src(`./lib/theme/tmp/${themeName}/*.scss`)
.pipe(sass.sync())
.pipe(autoprefixer({
cascade: false
}))
.pipe(cssmin())
.pipe(gulp.dest(`./lib/theme/${themeName}`));
});
// 拷贝 font
tmpTaskList[`${themeName}-theme-font`] = gulp.task(`${themeName}-theme-font`, function () {
return gulp.src(`./lib/styles/fonts/**`)
.pipe(gulp.dest(`./lib/theme/${themeName}/fonts`));
});
// 最后将这个主题的任务都串起来
themeMapTaskList[`${themeName}-theme`] = gulp.task(`${themeName}-theme`, seq.apply(null, _.keys(tmpTaskList)));
});
// 最后将tmp目录删掉
themeMapTaskList['del-theme-tmp'] = gulp.task('del-theme-tmp', cb => {
return del([
'./lib/theme/tmp'
], cb);
});
};
initThemeMap();
gulp.task('theme', seq.apply(null, _.keys(themeMapTaskList)));
这个任务比较复杂,具体逻辑可以看这一篇 自建vue组件 air-ui (15) -- 主题定制
总结
这样子组件库就打包好了,目录是这样子的:
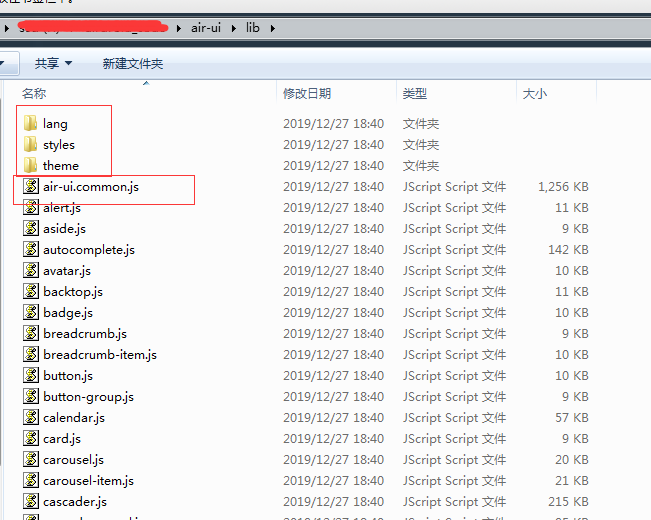
具体各种方式的引入 自建vue组件 air-ui (1) -- 为啥我要自建一个类 element ui 的组件 这个有说了。 接下来下一节我们讲一下 air-ui 怎么实现主题定制,又跟 element-ui 差别在哪里。
系列文章:
自建vue组件 air-ui (1) -- 为啥我要自建一个类 element ui 的组件
自建vue组件 air-ui (2) -- 先分析一下 element ui 项目
自建vue组件 air-ui (3) -- css 开发规范
自建vue组件 air-ui (4) -- air-ui 环境搭建和目录结构
自建vue组件 air-ui (5) -- 创建第一个组件 Button
自建vue组件 air-ui (6) -- 创建内置服务组件
自建vue组件 air-ui (7) -- 创建指令组件
自建vue组件 air-ui (8) -- 实现部分引入组件
自建vue组件 air-ui (9) -- 用 vuepress 写文档
自建vue组件 air-ui (10) -- vuepress 写文档 (进阶版)
自建vue组件 air-ui (11) -- vuepress 写文档 (爬坑版)
自建vue组件 air-ui (12) -- 国际化机制
自建vue组件 air-ui (13) -- 国际化机制(进阶版)
自建vue组件 air-ui (14) -- 打包构建(dev 和 dist)
自建vue组件 air-ui (15) -- 主题定制
自建vue组件 air-ui (16) -- 打包构建 pub 任务
自建vue组件 air-ui (17) -- 开发爬坑篇以及总结