前言
早在 2020-06-19 的时候,就有安装了 webrtc 的 SFU 开源框架 Kurento: 初试 webrtc SFU 开源框架 - Kurento, 那时候 node demo 脚本, kurento 服务, turnserver 是属于 3 台机器的。 本次搞了一个 16 核 32 G 的竞价型 云服务器。 打算在裸机的基础上, 直接在这台服务器上全部部署,并应用起来。 直接在这台性能比较强的机器上, 开个直播看看, 看看性能怎么样。
本次部署云服务器
16 核 32 G CentOS 7, 裸机
前置安装软件
安装翻墙软件
安装 shadowsocks
安装过程中,有些需要翻墙 (比如 docker, node 的安装),所以要先把 翻墙环境搞定。 所以首先应该先处理翻墙环境, 参照我以前的教程: CentOS7 配置 shadowsocks 全局代理
在这之前,要先安装 python3 (python 2.7 虽然有预安装,但是这个版本已经不再维护了,所以还是自己装 python 3)1
2
3
4
5sudo yum install epel-release -y
sudo yum install -y python36
python3 --version
这时候 python3 就装好了1
2[root@VM-0-13-centos ~]# python3 --version
Python 3.6.8
接下来 安装 pip3:1
2
3[root@VM-0-13-centos ~]# python3.6 -m ensurepip
WARNING: Running pip install with root privileges is generally not a good idea. Try `__main__.py install --user` instead.
Requirement already satisfied: setuptools in /usr/lib/python3.6/site-packages
安装完之后,查了一下, 版本有点旧:1
2
3[root@VM-0-13-centos ~]# pip3 list
pip (9.0.3)
setuptools (39.2.0)
所以还是要将 pip 版本升级上来:1
2
3
4
5
6
7[root@VM-0-13-centos ~]# pip3 install --upgrade pip
WARNING: Running pip install with root privileges is generally not a good idea. Try `pip3 install --user` instead.
Collecting pip
Downloading http://mirrors.tencentyun.com/pypi/packages/8a/d7/f505e91e2cdea53cfcf51f4ac478a8cd64fb0bc1042629cedde20d9a6a9b/pip-21.2.2-py3-none-any.whl (1.6MB)
100% |████████████████████████████████| 1.6MB 30.0MB/s
Installing collected packages: pip
Successfully installed pip-21.2.2
1 | [root@VM-0-13-centos ~]# pip3 list |
这样子就升级上来了。 接下来安装 shadowsocks :1
pip3 install shadowsocks
然后接下来将代理的 配置文件写进去:1
2
3
4
5
6
7
8
9
10
11
12[root@VM-0-13-centos ~]# cd /etc/
[root@VM-0-13-centos etc]# mkdir shadowsocks
[root@VM-0-13-centos etc]# cd shadowsocks/
[root@VM-0-13-centos shadowsocks]# touch sslocal.json
[root@VM-0-13-centos shadowsocks]# sudo vim sslocal.json
[root@VM-0-13-centos shadowsocks]# cat sslocal.json
{
"server":"ts-1.xxx.club",
"server_port":2555,
"password":"xxxxx",
"method":"rc4-md5"
}
接下来启动 shadowsocks 客户端:1
2
3
4[root@VM-0-13-centos shadowsocks]# sslocal -c /etc/shadowsocks/sslocal.json -d start
INFO: loading config from /etc/shadowsocks/sslocal.json
2021-08-06 17:21:37 INFO loading libcrypto from libcrypto.so.10
started
启动的时候,肯定是后台启动的, 这个是 -d 表示后台。 其实这时候的端口号是 1080, 如果是正常启动的话, 这个端口号会打印出来1
2
3
4[root@VM-0-13-centos shadowsocks]# sslocal -c /etc/shadowsocks/sslocal.json start
INFO: loading config from /etc/shadowsocks/sslocal.json
2021-08-06 17:20:55 INFO loading libcrypto from libcrypto.so.10
2021-08-06 17:20:55 INFO starting local at 127.0.0.1:1080
安装 Privoxy
如果直接下载的话1
wget http://www.privoxy.org/sf-download-mirror/Sources/3.0.32%20%28stable%29/privoxy-3.0.32-stable-src.tar.gz
正常情况下,下载这个包是要翻墙的,我们可以先用可以翻墙的机器,先把这个包下载好, 然后拷贝到这台机器上。 或者直接用国内的源也行。
接下来进行解压 并 进入目录:1
2tar -vxf privoxy-3.0.32-stable-src.tar.gz
cd privoxy-3.0.32-stable/
创建一个用户 privoxy:1
useradd privoxy
安装 autoconf, 因为 接下来编译安装要用到:1
yum install autoconf
接下来开始编译安装:1
2
3autoheader && autoconf
./configure
make && make install
这样子就编译安装好了, 接下来进行配置。
配置之前,先备份:1
2[root@VM-0-13-centos privoxy-3.0.32-stable]# cd /usr/local/etc/privoxy/
[root@VM-0-13-centos privoxy]# cp config config.bak
接下来改配置:
先搜索关键字 listen-address 找到 listen-address 127.0.0.1:8118 这一句,保证这一句没有注释,8118 就是将来 http代理要输入的端口。1
2
3[root@VM-0-13-centos privoxy]# cat config | grep '127.0.0.1:8118'
# 127.0.0.1:8118
listen-address 127.0.0.1:8118
然后搜索 forward-socks5t,将 forward-socks5t / 127.0.0.1:9050 . 此句的注释去掉. 并且将端口号改成 shadowsocks 的端口号 1080:1
2
3
4
5[root@VM-0-13-centos privoxy]# sudo vim config
[root@VM-0-13-centos privoxy]# cat config | grep 'forward-socks5t'
# 5.2. forward-socks4, forward-socks4a, forward-socks5 and forward-socks5t
# forward-socks5t works like vanilla forward-socks5 but lets
forward-socks5t / 127.0.0.1:1080 .
最后启动一下:1
2[root@VM-0-13-centos privoxy]# service privoxy start
Starting Privoxy, OK.
翻墙配置
这样子这两个翻墙所要用的软件都安装并且启动好了,接下来就是进行配置了
接下来配置 /etc/profile, 要在全局的配置文件里面添加代理设置, 执行 vim /etc/profile, 最下面添加如下三句:1
2
3
4
5[root@VM-0-13-centos privoxy]# cat /etc/profile | grep proxy
# ss http proxy
export http_proxy=http://127.0.0.1:8118
export https_proxy=http://127.0.0.1:8118
export ftp_proxy=http://127.0.0.1:8118
然后生效 配置文件:1
[root@VM-0-13-centos privoxy]# source /etc/profile
这样子就配置完了, 接下来测试一下:1
2
3
4
5
6
7
8
9
10[root@VM-0-13-centos privoxy]# curl cip.cc
IP : 52.xx.xx.204
地址 : 日本 东京都 东京
运营商 : amazon.com
数据二 : 美国 | 华盛顿州西雅图市亚马逊(Amazon)公司数据中心
数据三 : 日本东京都东京 | 亚马逊
URL : http://www.cip.cc/52.xx.xx.204
这样子就翻墙成功了。
关掉翻墙也很简单, 就是将 /etc/profile 那三行注释掉, 然后用 source /etc/profile 生效。最后重新开一个 shell 的 terminal 窗口就行了。
重新开启翻墙也是一样,将 /etc/profile 那三行去掉注释,然后用 source /etc/profile 生效。最后重新开一个 shell 的 terminal 窗口就行了。
安装 docker
因为我们安装 kurento 的方式是通过 docker 镜像安装的, 所以我们要先安装 docker。
先把翻墙开起来, 然后按照这个教程安装即可: centos install docker1
2
3
4
5
6
7sudo yum install -y yum-utils
sudo yum-config-manager \
--add-repo \
https://download.docker.com/linux/centos/docker-ce.repo
sudo yum install docker-ce docker-ce-cli containerd.io
然后接下来启动:1
sudo systemctl start docker
然后验证一下:1
2
3
4
5
6
[root@VM-0-13-centos privoxy]# docker version
...
docker-init:
  Version:          0.19.0
  GitCommit:        de40ad0
安装 nodejs
因为 kurento 的 demo 都是用 nodejs 写的, 所以 nodejs 的环境也要安装。 安装个 nodejs 14 的版本就够了1
2
3
4
5
6curl -sL https://rpm.nodesource.com/setup_14.x | sudo bash -
sudo yum install -y nodejs
[root@VM-0-13-centos ~]# node -v
v14.17.4
而且会用到 bower, 所以要全局安装一下 bower:1
npm install -g bower
安装 git
因为拉取 demo 代码,需要 git, 所以也要安装:1
2
3
4yum install git
[root@VM-0-13-centos ~]# git --version
git version 1.8.3.1
安装 kurento
前置环境都装好了,接下来我们安装 kurento, 可以参照: 初试 webrtc SFU 开源框架 - Kurento, 直接用 docker 镜像安装1
docker pull kurento/kurento-media-server:latest
然后启动容器:1
2
3[root@VM-0-13-centos privoxy]# docker run --name kms -d -p 8888:8888 \
> kurento/kurento-media-server:latest
Bba46ff48cb2b159187ebdeda00d724a8cdbc66457e4078e75fc5b5399913026f
查看容器是否存在:1
2
3[root@VM-0-13-centos privoxy]# docker ps
CONTAINER ID IMAGE COMMAND CREATED STATUS PORTS NAMES
ba46ff48cb2b kurento/kurento-media-server:latest "/entrypoint.sh" 20 seconds ago Up 7 seconds (health: starting) 0.0.0.0:8888->8888/tcp, :::8888->8888/tcp kms
这样子就安装好了。 接下来测试 ws 的服务是否正常。 接下来测试是否可以连通上, 因为这个是一个 ws 的服务,所以用 curl 测试的时候,要加上 upgrade 头部 (这时候记得要先将 翻墙代理关掉,不然会报 privoxy 的错)1
2
3[root@VM-0-13-centos ~]# curl --include --header "Connection: Upgrade" --header "Upgrade: websocket" --header "Host: 127.0.0.1:8888" --header "Origin: 127.0.0.1" http://127.0.0.1:8888/kurento
HTTP/1.1 500 Internal Server Error
Server: WebSocket++/0.7.0
这时候返回 500 错误是对的。我们可以通过查看进程来判断 kms 的进程是否在:1
2
3[root@VM-0-13-centos ~]# ps -fC kurento-media-server
UID PID PPID C STIME TTY TIME CMD
root 14964 14943 0 17:48 ? 00:00:00 /usr/bin/kurento-media-server
安装 turnserver
要完整的跑起来,除了 KMS 安装成功之后, turn server 也要安装, 可以参照: webrtc 的 turn 服务器 coturn 的搭建
下载对应 tar 包,然后解压:1
2
3[root@VM-0-13-centos ~]# wget http://turnserver.open-sys.org/downloads/v4.5.0.7/turnserver-4.5.0.7-CentOS7.4-x86_64.tar.gz
[root@VM-0-13-centos ~]# tar xvfz turnserver-4.5.0.7-CentOS7.4-x86_64.tar.gz
进入到 turnserver-4.5.0.7 这个目录, 执行 install.sh, 直接进行安装:1
2
3
4
5
6
7
8
9
10[root@VM-0-13-centos ~]# cd turnserver-4.5.0.7/
[root@VM-0-13-centos turnserver-4.5.0.7]# ./install.sh
...
Installed:
turnserver-utils.x86_64 0:4.5.0.7-0.el7.centos
Complete!
SUCCESS !
这样子安装就好了, 接下来进行配置 /etc/turnserver/turnserver.conf
不过修改之前,要先用 openssl 生成证书:1
openssl req -x509 -newkey rsa:2048 -keyout /etc/turn_server_pkey.pem -out /etc/turn_server_cert.pem -days 99999 -nodes
按照惯例, 修改之前,先备份1
2
3
4
5[root@VM-0-13-centos turnserver-4.5.0.7]# cd /etc/turnserver/
[root@VM-0-13-centos turnserver]# ll
total 24
-rw-r--r-- 1 turnserver turnserver 23609 Dec 11 2017 turnserver.conf
[root@VM-0-13-centos turnserver]# cp turnserver.conf turnserver.conf.bak
然后再修改, 主要是修改这几个值:1
2
3
4
5
6
7
8
9
10
11
12
13
14
15
16
17
18
19
20
21
22
23
24
25
26
27
28
29
30
31
32
33
34
35
36
37
38
39
40
41
42
43
44
45
46
47
48
49[root@VM-0-13-centos turnserver]# diff turnserver.conf turnserver.conf.bak
97c97
< relay-ip=172.16.0.13
---
> #relay-ip=172.17.19.105
120c120
< external-ip=159.xx.xx.169
---
> #external-ip=60.70.80.91
165c165
< fingerprint
---
> #fingerprint
170c170
< lt-cred-mech
---
> #lt-cred-mech
200c200
< use-auth-secret
---
> #use-auth-secret
208c208
< static-auth-secret=1234567890
---
> #static-auth-secret=north
224c224
< realm=realm
---
> #realm=realm
416c416
< cert=/etc/turn_server_cert.pem
---
> #cert=/usr/local/etc/turn_server_cert.pem
423c423
< pkey=/etc/turn_server_pkey.pem
---
> #pkey=/usr/local/etc/turn_server_pkey.pem
469c469
< #no-stdout-log
---
> no-stdout-log
482c482
< log-file=/var/tmp/turn.log
---
> #log-file=/var/tmp/turn.log
486c486
< #syslog
---
> syslog
具体参数是:1
2
3
4
5
6
7
8
9
10
11
12
13
14
15
16
17
18
19
20
21
22
23
24
25
26
27
28
29
30
31
32
33
34
35# 设置转发的ip(局域网ip),如果不设置,他会自己选择默认的
relay-ip=172.xx.xxx.108
# 转发的外网ip(本机外网ip),用于NAT 地址映射
external-ip=47.96.xx.xx
# WebRTC 的消息里会用到
fingerprint
# WebRTC 认证需要
lt-cred-mech
# REST API 认证需要
use-auth-secret
# REST API 加密所需的 KEY
# 这里我们使用“静态”的 KEY,Google 自己也用的这个
static-auth-secret=1234567890
# 用户登录域
realm=realm
# 证书
cert=/etc/turn_server_cert.pem
# 证书key
pkey=/etc/turn_server_pkey.pem
# 不输出log
#no-stdout-log
# 输出的log,将log输出到 log
log-file=/var/tmp/turn.log
#syslog
接下来启动:1
2[root@VM-0-13-centos turnserver]# service turnserver start
Redirecting to /bin/systemctl start turnserver.service
这时候就可以看到 log 了:1
2
3
4
5[root@VM-0-13-centos tmp]# tail -f /var/tmp/turn_2021-08-06.log
0: IO method (auth thread): epoll (with changelist)
0: IO method (auth thread): epoll (with changelist)
0: IO method (auth thread): epoll (with changelist)
0: IO method (auth thread): epoll (with changelist)
可以直接访问 3478 端口:1
2
3
4
5
6
7
8
9
10
11
12
13
14
15
16
17
18
19
20
21[root@VM-0-13-centos ~]# curl 127.0.0.1:3478
<!DOCTYPE html>
<html>
<head>
<title>TURN Server</title>
</head>
<body>
<b>TURN Server</b> <br> <b><i>use https connection for the admin session</i></b>
</body>
</html>
[root@VM-0-13-centos ~]# curl 172.16.0.13:3478
<!DOCTYPE html>
<html>
<head>
<title>TURN Server</title>
</head>
<body>
<b>TURN Server</b> <br> <b><i>use https connection for the admin session</i></b>
</body>
</html>
本地和局域网可以访问, 但是 外网访问不了 curl 159.xx.xx.169:3478
这个其实是 腾讯云 那边 的安全组 的端口要对外开放才行。 而且不能只开放 tcp 的 3478, udp 也有一堆端口也要开放 (转发过程其实是通过 udp 协议转发的),尤其还有这个区间的1
2
3
4
5# Lower and upper bounds of the UDP relay endpoints:
# (default values are 49152 and 65535)
#
#min-port=49152
#max-port=65535
只有这些端口都开了, turnserver 才能对外进行转发

这样子我们在外网测试 3478 端口的时候, 就可以连上服务了:1
2
3
4
5
6
7
8
9
10[root@VM-0-13-centos ~]# curl 159.xx.xx.169:3478
<!DOCTYPE html>
<html>
<head>
<title>TURN Server</title>
</head>
<body>
<b>TURN Server</b> <br> <b><i>use https connection for the admin session</i></b>
</body>
</html>
这边要注意一个细节, 因为这个是 demo, 所以我们并没有开启 turnserver 的流量收集统计,turnserver 是有自带流量收集的配置的, 是这个配置:1
2#redis-statsdb="ip=<ip-address> dbname=<database-number> password=<database-user-password> port=<port> connect_timeout=<seconds>"
redis-statsdb="ip=xx.xx.xx.156 dbname=13 port=6379 connect_timeout=30"
其实就是抛到 redis 的队列上, 就是采用 订阅的方式, 具体还可以看: coturn 添加redis实现对转发流量和转发时长的统计
不过如果要统计准确的话, 还要再安装一个依赖 hiredis-devel 依赖,依赖安装如下:1
yum install gcc gcc-c++ openssl-devel libevent2 libevent2-devel hiredis-devel
启动之后, 接下来要验证校验是否可以正常连接,具体算法可以看: webrtc 的 turn 服务器 coturn 的权限校验
虽然可以配置固定的 用户名 和 密码1
2#user=username1:password1
#user=username2:password2
但是这种情况下, 我们一般不用, 正常情况下,还是走静态密码验证, 算法也很简单,我们用一个简单的 golang 就可以得到:1
2
3
4
5
6
7
8
9
10
11
12
13
14
15
16
17
18
19
20
21
22
23
24
25
26
27
28
29
30
31
32package main
import (
"strconv"
"time"
"fmt"
"encoding/base64"
"crypto/hmac"
"crypto/sha1"
)
func Base64EncodeToStr(str string) string {
return base64.StdEncoding.EncodeToString([]byte(str))
}
func HmacSha1(key, data string) string {
h := hmac.New(sha1.New, []byte(key))
h.Write([]byte(data))
return string(h.Sum(nil))
}
func main() {
var ttl int64
ttl = 864000
username := "kbz"
expired := time.Now().Unix() + ttl
username = strconv.Itoa(int(expired)) + ":" + username
// turnserver 这个值 static-auth-secret=1234567890
key := "1234567890"
password := Base64EncodeToStr((HmacSha1(key, username)))
fmt.Println(fmt.Sprintf("%v,%v", username, password))
}
通过这个算法,我们其实是可以算出来的。 所以就可以得到这个 turnserver 的校验值:1
2
3turn:159.xx.xx.169:3478
1629112375:kbz
VpNSo+WtI0AEsSQ96hWZZriiY4c=
然后就可以到这个站点 trickle-ice 进行验证
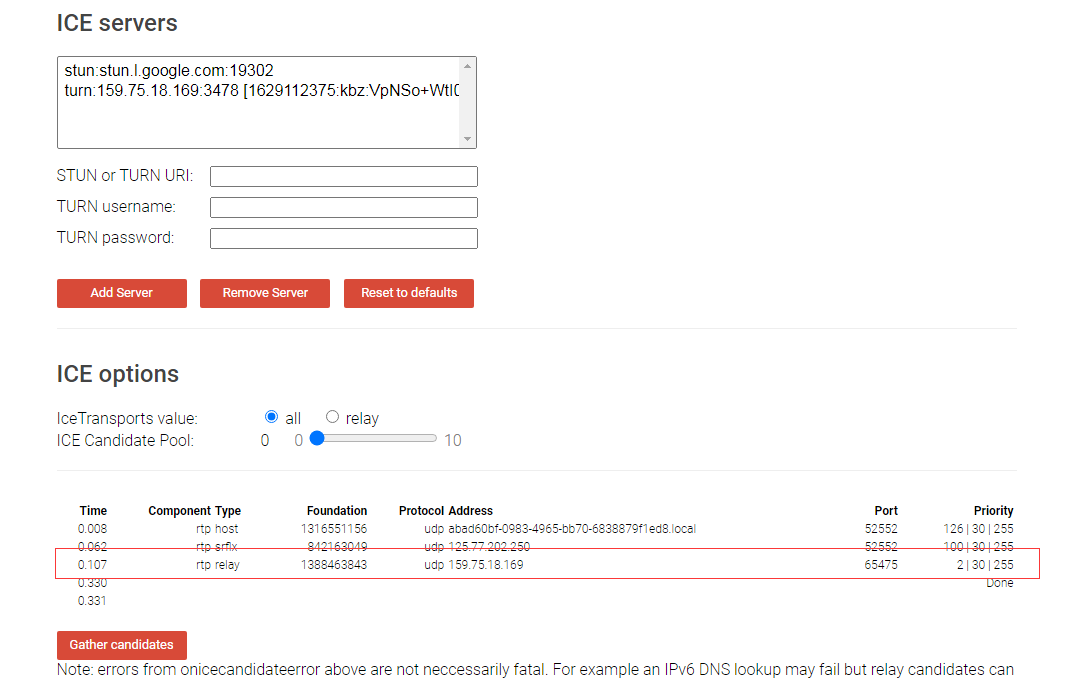
这样子就可以测试成功了。
demo 演示
还是一样, 用那两个 demo 来处理。具体 demo 细节: 初试 webrtc SFU 开源框架 - Kurento
demo – hello world
拉取代码并跑起来:1
2
3
4
5
6
7
8git clone https://github.com/Kurento/kurento-tutorial-node.git
cd kurento-tutorial-node/kurento-hello-world
git checkout master
npm install
cd static
bower install --allow-root
cd ..
npm start
1 | [root@VM-0-13-centos kurento-hello-world]# npm start |
这时候因为要外网访问, 所以 8443 端口要在安全组开放, 才能访问。
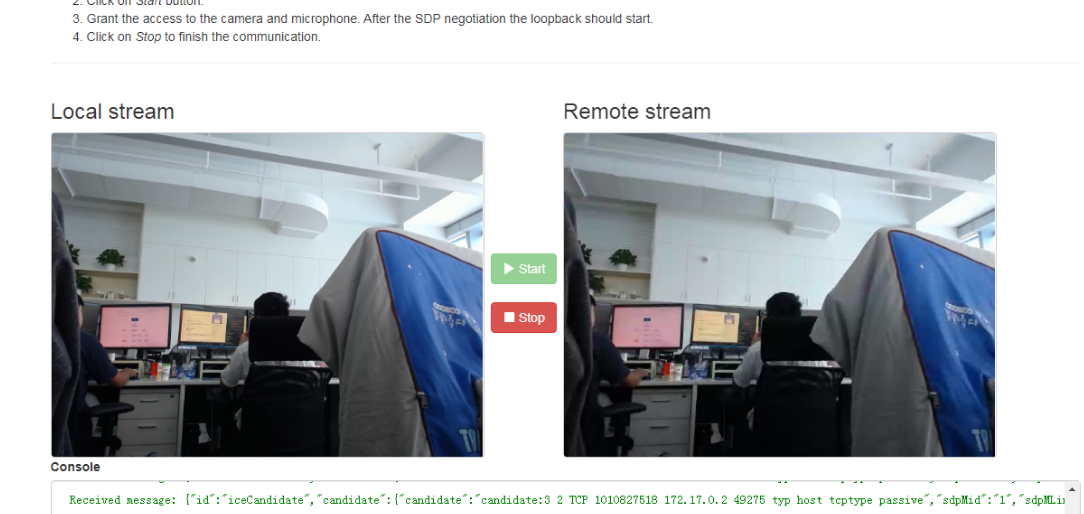
但是因为没有配 turnserver 配置,所以就会出现远程视频流出不来。 所以代码还是跟之前一样,要改一下:1
2
3// 设置 turnserver
webRtcEndpoint.setTurnUrl("1629112375:kbz:VpNSo+WtI0AEsSQ96hWZZriiY4c=@159.xx.xx.169:3478", function(data){
if (candidatesQueue[sessionId]) {
这边要注意, turnserver 的地址,要填 外网地址才行, 填 127.0.0.1 或者 localhost 都是不行的, 只有填外网地址,才能成功转发。
反倒是连接 kurento 的时候, 内网地址是可以的, 当然外网地址也是可以的, 如果 8888 端口也有外网开放的话:1
ws_uri: 'ws://127.0.0.1:8888/kurento'
图像可以成功看到:
demo – one2many
第二个就是主播的方式, 一样先改代码,再启动 (为了便于对比,改之前将原来的 server.js 做一下备份成 server.js.bak):1
2
3
4
5
6
7
8
9
10
11
12
13
14
15
16
17
18
19
20
21
22
23
24
25[root@VM-0-13-centos kurento-one2many-call]# diff server.js server.js.bak
30c30
< ws_uri: 'ws://127.0.0.1:8888/kurento'
---
> ws_uri: 'ws://localhost:8888/kurento'
217,218c217
< webRtcEndpoint.setTurnUrl("1629112375:kbz:VpNSo+WtI0AEsSQ96hWZZriiY4c=@159.xx.xx.169:3478", function(data){
< console.log("=======" + data);
---
>
256d254
< });
259c257
< });
---
> });
275,276d272
< webRtcEndpoint.setTurnUrl("1629112375:kbz:VpNSo+WtI0AEsSQ96hWZZriiY4c=@159.xx.xx.169:3478", function(data){
< console.log("=======" + data);
332d327
< });
364c359
< kurentoClient && kurentoClient.close();
---
> kurentoClient.close();
然后安装依赖,启动:1
2
3
4
5npm install
cd static
bower install --allow-root
cd ..
npm start
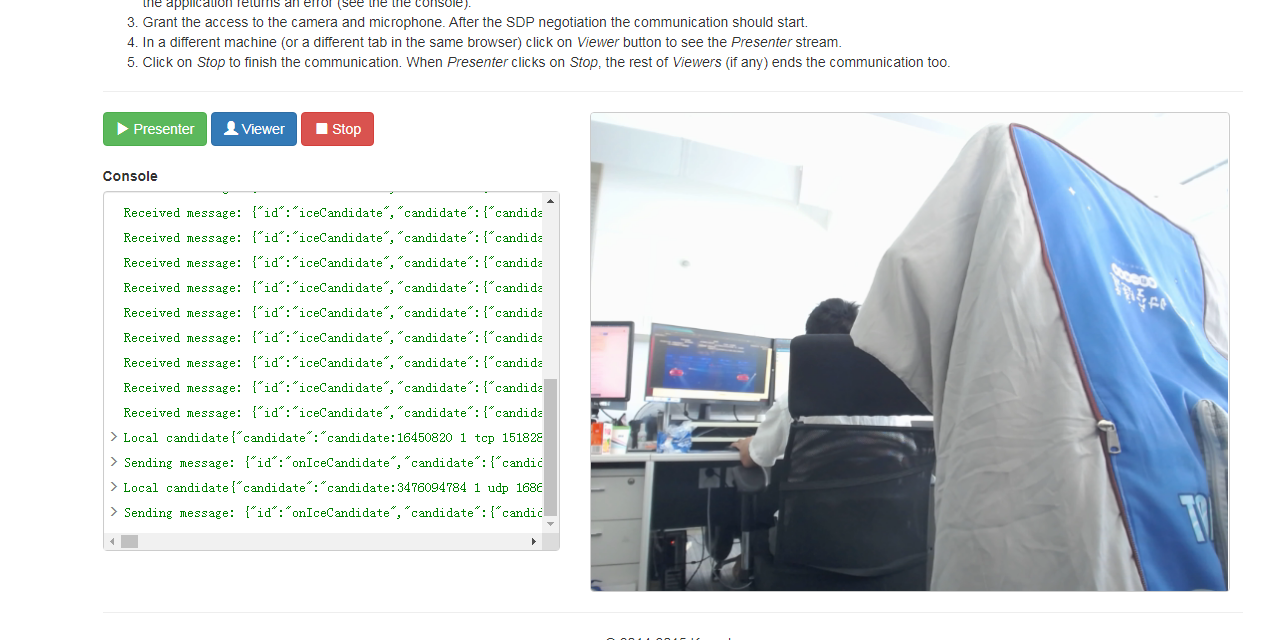
效果还是不错的,同时在线人数, 50+ 没问题的,而且对于服务器的负载也不高,最高也不会超过 1, 偶尔超过 1,但是马上就下来了。
就是有时候,会没有画面, 导致退出得重新刷新,点击 viewer 按钮。 主播这边倒是挺稳定的。不过还得再优化一下。