前言
之前有处理过 nginx 转发代理 wss 和 https (目标程序是 ws 和 http), 后面发现我们的服务还有一些是 tcp 长连接,而且还是支持 tls 的 tcp 长连接。 这个也是非 80 和 443 端口的。 后面也需要用 nginx 转发代理一下。
nginx 支持 tcp 层的转发
nginx 1.9 开始支持 tcp 层的转发,通过 stream 实现的,而 socket 也是基于 tcp 通信,跟 ws 和 wss 不一样, 本质上 ws 虽然也是长连接, 但是他是基于 http 的协议上去进行协议升级的,所以可以写在 http 指令串里面。
但是 tcp 不支持,而且依赖的模块也不一样,他依赖的是 ngx_stream_core_module, 这个模块也是要单独安装的。而且这个 stream 块, 只能放到 nginx.conf 文件中,不能放到 site-avaliable 目录中, 不然就会变成 http 的。
安装 stream 和 ssl_stream 模块
安装 nginx,stream 模块默认不安装的, 通过 /usr/local/nginx/sbin/nginx -V 查找1
2
3
4
5
6[root@VM-0-13-centos ~]# /usr/local/nginx/sbin/nginx -V
nginx version: nginx/1.18.0
built by gcc 4.8.5 20150623 (Red Hat 4.8.5-44) (GCC)
built with OpenSSL 1.0.2k-fips 26 Jan 2017
TLS SNI support enabled
configure arguments: --prefix=/usr/local/nginx --with-http_ssl_module
目前只安装 http 的 ssl 的模块, 并没有包含 ngx_stream_core_module 这个模块, 所以我们只需要重新编译一下,覆盖一下:1
[root@VM-0-13-centos nginx-1.18.0]# ./configure --prefix=/usr/local/nginx --with-http_ssl_module --with-stream --with-stream_ssl_module
具体步骤可以看: CentOS 7 安装 Nginx 的 现有的 nginx 程序添加 http_ssl_module 模块 小节,一样的流程。而且这次不仅仅要添加 stream 模块, ssl_stream 模块也要用到,因为我们也有用到 tls 的 tcp 连接。所以两个一起加进去。
最后添加完之后是这样子:1
2
3
4
5
6[root@VM-0-13-centos nginx-1.18.0]# /usr/local/nginx/sbin/nginx -V
nginx version: nginx/1.18.0
built by gcc 4.8.5 20150623 (Red Hat 4.8.5-44) (GCC)
built with OpenSSL 1.0.2k-fips 26 Jan 2017
TLS SNI support enabled
configure arguments: --prefix=/usr/local/nginx --with-http_ssl_module --with-stream --with-stream_ssl_module
简单的转发 demo
我们写个简单的 demo
客户端 demo
1 | package main |
服务端 demo
1 | package main |
逻辑很简单, 服务端监听的端口是 8008, 但是 客户端连接的端口是 8006。 说明 nginx 会代理这个 tcp 请求
nginx 配置:
这个要配在 nginx.conf 文件中, 原先的都可以不变,再最下面加上
1 | stream { |
逻辑很简单,如果是 tcp 请求,那么就将 8006 端口代理到上游服务的 8008 端口中。
先启动 demo 的 server, 再启动 demo 的 client,然后两者进行交互, server log 如下:1
2
3
4
5
6
7
8
9
10
11
12[root@VM-0-13-centos new-demo]# ./server
服务器开始监听端口
&{0xc0000cc000 {<nil> 0}}
等待客户端连接
suc conn=&{{0xc0000cc080}},客户端ip=127.0.0.1:27071
等待客户端连接
服务器在等待客户端127.0.0.1:27071发送信息
客户端发送的数据: hello
服务器在等待客户端127.0.0.1:27071发送信息
客户端发送的数据: this is test
服务器在等待客户端127.0.0.1:27071发送信息
客户端退出 err= EOF
client log:1
2
3
4[root@VM-0-13-centos new-demo]# ./client
hello
this is test
q
可以看到转发 tcp 是没有问题的。
tls 版本 demo
接下来试一下 tls tcp 的版本, 之前已经装了 stream_ssl_module, 所以这边直接配置。 证书用自制的就行了
客户端 demo
1 | package main |
这次不需要服务端修改, 因为是走 tcp tls 代理的, 上游程序还是一样是 8008 的非 tls 的 tcp 连接。 而且因为是自制证书, 所以客户端连接的时候,要指定 insecure 选项
nginx 配置
1 | stream { |
server log:1
2
3
4
5
6
7
8
9
10
11
12[root@VM-0-13-centos new-demo]# ./server
服务器开始监听端口
&{0xc0000c4000 {<nil> 0}}
等待客户端连接
suc conn=&{{0xc0000c4080}},客户端ip=127.0.0.1:33291
等待客户端连接
服务器在等待客户端127.0.0.1:33291发送信息
客户端发送的数据: this is tc
服务器在等待客户端127.0.0.1:33291发送信息
客户端发送的数据: this is tls hello
服务器在等待客户端127.0.0.1:33291发送信息
客户端退出 err= EOF
client log:1
2
3
4[root@VM-0-13-centos new-demo]# ./client-tls
this is tc
this is tls hello
q
可以看到转发没有问题。 而且也不一定要合法证书,用自建证书,然后 ip 地址连接,然后再配置跳过 ssl 校验的话,那么是可以的。
这样子就可以将 入口的 tls tcp 转发到非 tls 的 tcp 后端程序。 跟之前用 nginx 代理 wss 一样, 后端程序不用改成 tls, 走 nginx 即可。
使用 SNI 来使得 https 和 tls tcp 复用 443 端口
正常情况下, 在 同一个 nginx 配置中, http 块 和 stream 是没办法同时监听 443 端口的。 How to combine nginx “stream” and “http” for the same servername?
那么如果我一定要这么配呢,会出现什么情况,会报错吗? 客户端和服务端还是不变。 然后 nginx.conf 配置变一下, http 和 stream 都监听 tls 4431
2
3
4
5
6
7
8
9
10
11
12
13
14
15
16
17
18
19
20
21
22
23
24
25
26
27
28
29
30
31
32
33
34
35
36
37
38
39
40
41
42[root@VM-0-13-centos conf]# cat nginx.conf
worker_processes 1;
events {
worker_connections 1024;
}
http {
# HTTPS server
server {
listen 443 ssl;
server_name localhost;
ssl_certificate ssl/server.crt;
ssl_certificate_key ssl/server.key;
ssl_ciphers HIGH:!aNULL:!MD5;
ssl_prefer_server_ciphers on;
location / {
root html;
index index.html index.htm;
}
}
}
stream {
upstream tcpend {
server 127.0.0.1:8008;
}
server {
#listen 8006;
listen 443 ssl;
proxy_pass tcpend;
ssl_certificate ssl/server.crt;
ssl_certificate_key ssl/server.key;
ssl_protocols SSLv3 TLSv1 TLSv1.1 TLSv1.2;
ssl_ciphers HIGH:!aNULL:!MD5;
ssl_prefer_server_ciphers on;
}
}
然后用 tcp 客户端连一下, 发现是可以连接上的:
1 | suc conn=&{{0xc0000c4100}},客户端ip=127.0.0.1:35825 |
可以连上去,说明没问题。
然后接下来用 curl 请求一下 https 请求:1
[root@VM-0-13-centos sbin]# curl https://127.0.0.1:443 --insecure
发现没有走 http 块,还是走到 stream 块,所以直接转发到 上游服务 8008 端口那边:1
2
3
4
5
6
7
8
9
10
11suc conn=&{{0xc0000e4000}},客户端ip=127.0.0.1:36171
等待客户端连接
服务器在等待客户端127.0.0.1:36171发送信息
客户端发送的数据: GET / HTTP/1.1
User-Agent: curl/7.29.0
Host: 127.0.0.1
Accept: */*
服务器在等待客户端127.0.0.1:36171发送信息
客户端退出 err= EOF
说明虽然 http 和 stream 都可以监听 443 端口, 但是其实流量只会走 stream 块。 http 块不会走。
那么跟 nginx.conf 的 stream 块和 http 块的顺序是否有关呢, 上面的配置文件是 http 上面, stream 下面, 我将其调换一下。 发现结果还是一样。 流量都走 stream 了。
所以其实就可以理解 443 端口其实是被 stream 块使用了, http 块不行。因为 http 协议(网络层第七层应用层)本质上也是基于 tcp 协议(网络层第四层传输层), 所以如果在传输层就将流量劫持了,那么就没有上层的事情了。 我如果将 http 块的监听,换成其他端口,比如 8001 而不是 443,那么是可以正常走到 https 那一边。
1 | [root@VM-0-13-centos new-demo]# curl https://127.0.0.1:8001 --insecure |
所以至少从上面的配置来说, stream 和 http 是无法复用 443 端口。 但是其实还有一种方式可以让 https/wss 和 tls tcp 复用 443 端口,那就是 SNI(Server Name Indication)
SNI 概念
传输层安全性协议(即大名鼎鼎的 TLS)是一个工作在传输层上的重要安全协议,它可以为互联网通信提供安全及数据完整性保障,像HTTPS等安全传输都是基于TLS所进行的。
服务器名称指示(SNI)是TLS的一个扩展协议,在该协议下,在握手过程开始时客户端告诉它正在连接的服务器要连接的主机名称。Nginx 就可以利用stream模块,基于SNI,对进入同一端口、不同主机名的TLS流量进行分流。如果你有一个基于TLS的应用,想要运行在443端口;而443端口已经被Nginx监听用作Web运行网站,你就可以使用Nginx的SNI分流,将443端口复用,把使用不同的域名(主机名)的TLS流量分开,互不干扰,完美共存。
nginx 的版本至少要 1.15.9
前置准备工作 1: 安装模块
如果要开启 SNI, 除了之前我们安装的 ngx_stream_core_module 模块(stream模块), 那么就还需要开启 ngx_stream_ssl_preread_module, 所以我们要再重新编译加载 --with-stream_ssl_preread_module。1
2
3
4
5
6[root@VM-0-13-centos conf]# nginx -V
nginx version: nginx/1.18.0
built by gcc 4.8.5 20150623 (Red Hat 4.8.5-44) (GCC)
built with OpenSSL 1.0.2n 7 Dec 2017
TLS SNI support enabled
configure arguments: --prefix=/usr/local/nginx --with-http_ssl_module --with-stream --with-stream_ssl_module --with-stream_ssl_preread_module
前置准备工作 2: 设置域名和有效证书
因为 SNI 是基于域名的,所以我们要准备两个域名,一个用于 tcp 转发,一个用于 http 转发
test-tcp-proxy.example.com这个是 tcptest-tcp-http.example.com这个是 https
前置准备工作 3: 上游程序要支持 tls tcp 连接
因为 SNI 是基于 tls 传输的,不仅客户端入口连接的时候,要走 tls 加密, 连上游服务器 upstream 在转发的时候也要走 tls 监听
这一点跟上述的 nginx 代理转发 非 tls tcp 的 upstream 是不一样的。 SNI 的 upstream 一定要走 tls 才行。 这时候当初实践的时候,踩了一个大坑如果 upstream 没有走 tls 监听的话, 是可以连上,但是握手的时候会报一堆的乱码:1
2
3
4
5
6
7
8
9suc conn=&{{0xc0000c2180}},客户端ip=127.0.0.1:29852
等待客户端连接
服务器在等待客户端127.0.0.1:29852发送信息
客户端发送的数据: ¸#△Έ©ԿL<:=枾^輁녆»¤ ׀'&¿¨8Ju{W°:L!:go2ేV%&ᆵᄚᆱᆲ̨̩モ ヤ
/5メ
est-tcp-proxy.example.com
ÿ+ 3&$ L(¦²
LԼǹR껣 ¨َࠩ|·µX
事实上,这一块,文档是有写的:
Pass the TLS stream to an upstream server, based on the domain name from TLS SNI field. This does not terminate TLS.
The upstream server can serve HTTPS or other TLS secured TCP responses.
所以我们的服务端程序要改造一下, 换成 tls tcp 监听 88891
2
3
4
5
6
7
8
9
10
11
12
13
14
15
16
17
18
19
20
21
22
23
24
25
26
27
28
29
30
31
32
33
34
35
36
37
38
39
40
41
42
43
44
45
46
47
48
49
50
51
52
53
54
55
56
57
58
59
60
61
62package main
import (
"fmt"
"net"
"crypto/tls"
"crypto/rand"
"time"
"os"
)
func process(conn net.Conn) {
defer conn.Close()
for {
buf := make([]byte, 1024)
fmt.Printf("服务器在等待客户端%s发送信息\n", conn.RemoteAddr().String())
n, err := conn.Read(buf)
if err != nil {
fmt.Println("客户端退出 err=", err)
return
}
fmt.Println("客户端发送的数据:", string(buf[:n]))
}
}
func main() {
fmt.Println("服务器开始监听端口")
crt, err := tls.LoadX509KeyPair("./example.com.crt", "./example.com.key")
if err != nil {
fmt.Println(fmt.Sprintf("phone load tls key pair err,%v", err.Error()))
os.Exit(1)
}
tlsConfig := &tls.Config{}
tlsConfig.MinVersion = tls.VersionTLS10
tlsConfig.MaxVersion = tls.VersionTLS12
tlsConfig.Certificates = []tls.Certificate{crt}
// Time returns the current time as the number of seconds since the epoch.
// If Time is nil, TLS uses time.Now.
tlsConfig.Time = time.Now
// Rand provides the source of entropy for nonces and RSA blinding.
// If Rand is nil, TLS uses the cryptographic random reader in package
// crypto/rand.
// The Reader must be safe for use by multiple goroutines.
tlsConfig.Rand = rand.Reader
listen, err := tls.Listen("tcp", ":8889", tlsConfig)
if err != nil {
fmt.Println(fmt.Sprintf("phone tcp err,%v", err.Error()))
os.Exit(1)
}
fmt.Println(fmt.Sprintf("===load tls tcp success"))
defer listen.Close()
for {
fmt.Println("等待客户端连接")
conn, err := listen.Accept()
if err != nil {
fmt.Println("Accept err=", err)
} else {
fmt.Printf("suc conn=%v,客户端ip=%v\n ", conn, conn.RemoteAddr().String())
}
go process(conn)
}
}
同时 客户端的那个 tls 的程序的连接地址也改成对应的地址:1
conn, err := tls.Dial("tcp", "test-tcp-proxy.example.com:443", nil)
这时候证书是合法的,不需要设置为不安全的选项
nginx 的配置文件:
1 | [root@VM-0-13-centos conf]# cat nginx.conf |
这边 https 的时候,有启用了 http2 优化,这个模块 http_v2_module 也是要额外载入的。 而且他要求 openssl 的版本必须在1.0.2e及以上。 在 configure 的时候,补上 --with-http_v2_module 就可以了。
同时 设置分流的时候, 这边用内网 ip 172.16.0.13 来指定, 如果不指定(直接 listen 443)或者指定为 listen [::]:443 都不行
接下来我们测试一下 分流的情况:
首先启用 tcp 的连接客户端,然后看下服务端 upstream 的日志:1
2
3
4
5
6
7
8
9
10
11
12[root@VM-0-13-centos new-demo]# ./server-tls
服务器开始监听端口
===load tls tcp success
等待客户端连接
suc conn=&{0xc00000e048 false 0 {0 0} <nil> 0 false 0xc000001500 0 false 0 [] [] [] [] false <nil> [] false <nil> false [0 0 0 0 0 0 0 0 0 0 0 0] [0 0 0 0 0 0 0 0 0 0 0 0] false {{0 0} <nil> 0 <nil> <nil> [0 0 0 0 0 0 0 0] [0 0 0 0 0 0 0 0 0 0 0 0 0] <nil> <nil> []} {{0 0} <nil> 0 <nil> <nil> [0 0 0 0 0 0 0 0] [0 0 0 0 0 0 0 0 0 0 0 0 0] <nil> <nil> []} {[] 0 0} {[] 0 0} {[] 0 0} [] false [] 0 0 0 0 [0 0 0 0 0 0 0 0 0 0 0 0 0 0 0 0]},客户端ip=127.0.0.1:45579
等待客户端连接
服务器在等待客户端127.0.0.1:45579发送信息
客户端发送的数据: 123
服务器在等待客户端127.0.0.1:45579发送信息
客户端发送的数据: 666
服务器在等待客户端127.0.0.1:45579发送信息
客户端退出 err= EOF
可以看到数据正常。
然后再用 curl 请求 https 试一下:1
2
3
4
5
6
7[root@VM-0-13-centos new-demo]# curl "https://test-web-proxy.example.com"
<!DOCTYPE html>
<html>
<head>
<title>Welcome to nginx!</title>
<style>
body {
发现也是正常的, 所以这个分流是可以的。
后续遇到的问题
1. 跟其他的 nginx wss 的服务一起配置会有问题
因为 SNI 要配置在 nginx.conf 文件,但是其他的 nginx 代理转发 wss, 是可以配置在 site-avaliable 目录下的。如果要共存的话是会有问题的。
假设我们还有一个 nginx wss 的代理,域名是 test-wss-data.example.com, 那么他也是要走分流的 (流量被劫持了), 那么 nginx.conf 的配置如下:
1 | [root@VM-0-13-centos conf]# cat nginx.conf |
然后 /usr/local/nginx/conf/site-avaliable/wss.conf 就是:1
2
3
4
5
6
7
8
9
10
11
12
13
14
15
16
17
18
19
20
21
22
23
24
25
26
27
28
29
30
31
32
33[root@VM-0-13-centos site-avaliable]# cat wss.conf
map $http_upgrade $connection_upgrade {
default upgrade;
'' close;
}
upstream data{
server 127.0.0.1:8007 fail_timeout=0;
}
server {
server_name test-wss-data.example.com;
listen 9443 ssl http2;
ssl_certificate ssl/now/example.com.crt;
ssl_certificate_key ssl/now/example.com.key;
ssl_protocols SSLv3 TLSv1 TLSv1.1 TLSv1.2;
ssl_ciphers HIGH:!aNULL:!MD5;
ssl_prefer_server_ciphers on;
port_in_redirect off;
location = /ws {
proxy_pass http://data;
proxy_read_timeout 300s;
proxy_send_timeout 300s;
proxy_set_header Host $host;
proxy_set_header X-real-ip $remote_addr;
proxy_set_header X-Forwarded-For $proxy_add_x_forwarded_for;
proxy_http_version 1.1;
proxy_set_header Upgrade $http_upgrade;
proxy_set_header Connection $connection_upgrade;
}
}
就跟我们在 nginx 转发代理 wss 和 https (目标程序是 ws 和 http) nginx.conf 的配置差不多,只不过是挪到了 site-avaliable 中
具体效果:
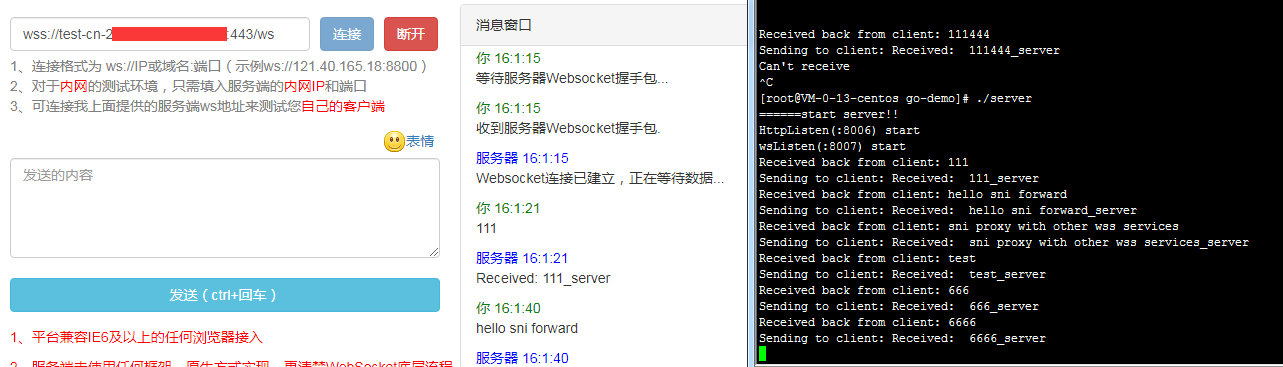
其实就是将 443 再转发到 9443。 通过 port_in_redirect 这个配置。 他默认是 on 的, 也就是当前 listen 是多少端口,那么就反代什么端口。
但是对于本例来说,我们要反代的端口是不一样的,从 443 -> 9443, 所以我们要将其关掉。 同时 wss 的 data 程序就会变成 二级代理的方式了。
这样子就可以在原来 SNI 分流的基础上,再接入之前的 wss 转发代理服务了。缺点就是因为变成了二级代理的方式,每次都要多设置一个代理端口,本例就是 9443 端口。
2. 关于 android 6.0 及以下的握手问题
之前用 SNI 的时候,还有出现一个问题,就是在我们的 app 上, android 7.0 及以上的设备都可以成功连接上。 但是 android 6.0 及以下的设备却是会握手失败。
后面通过对 android 6.0 和 android 7.0 的 443 端口的抓包:1
2[root@VM-0-13-centos ~]# sudo tcpdump -i eth0 port 443 -w ./target.cap
tcpdump: listening on eth0, link-type EN10MB (Ethernet), capture size 262144 bytes
还真发现了问题,android 6 在握手的 client hello 的报文中,是找不到 server_name 这一条扩展字段的。但是 android 7 的 client hello 报文中,就可以找到 server_name 的扩展字段:
1 | Extension: server_name (len=34) |
因为如果是要完成 SNI 分流的话,那么是需要在 client hello 的报文中,添加 server_name 段的,用来指明请求的域名,这样子 nginx 才能针对这个域名来下发对应的 ssl 证书。 具体文档: Server Name Indication
所以需要 android 6 那边的程序,在进行 握手的时候, 添加 server_name 的这个扩展字段就可以了。 而且如果是 SNI 导致的握手问题的话,其实是不会返回具体错误的,nginx 那边会直接返回 FIN ACK, 刚好符合 android 那边的错误日志,因为除了握手失败之外,没有其他的信息。 而如果是 加密套件 失败的话,是会有更具体的错误信息的。
几种优化措施
1. 使用 reuseport 来允许多个 socket 来监听同一个端口
我们可以在分流的时候, 加上 reuseport, 这个可以提高性能。
reuseport 是一种套接字复用机制,它允许你将多个套接字 bind 在同一个IP地址/端口对上,这样一来,就可以建立多个服务来接受到同一个端口的连接。 reuseport 是支持多个进程或者线程绑定到同一端口,提高服务器程序的吞吐性能,其优点体现在如下几个方面:
- 允许多个套接字 bind()/listen() 同一个TCP/UDP端口
- 每一个线程拥有自己的服务器套接字
- 在服务器套接字上没有了锁的竞争,因为每个进程一个服务器套接字
- 内核层面实现负载均衡
- 安全层面,监听同一个端口的套接字只能位于同一个用户下面
可以写在 stream 块 或者 http 块:1
2
3
4
5server {
listen 172.16.0.13:443 reuseport;
proxy_pass $stream_map;
ssl_preread on;
}
2. 启用 http2 模块
这个上面已经说了,开启 http2 模块,不仅可以做到多路复用,它的 header 还会压缩,减少体积。
这个是在 http 块开启的:1
2server {
listen 127.0.0.1:443 ssl http2;
3. 设置超时
如果我们需要在 tcp 上传一些资料的话,尤其是大文件二进制的话,那么也是要在 stream 那边设置超时的:1
2
3stream {
proxy_timeout 3600s;
proxy_connect_timeout 3600s;
参考资料: