前言
前段时间在项目的安全审计中,有发现了一个关于后端开发中,使用 aws sdk 的一个安全隐患,就是后端的一些项目中,有用到了 aws 的一些功能,包含 s3,ses,dynamodb 等,而这些功能用的 key 都是同一个 key, 都是属于在 aws 后台创建的 develop 用户。
这个 develop 用户在 aws 后台具有以下的策略权限(policy):
- dynamodb 功能的所有权限 –>
AmazonDynamoDBFullAccess - s3 功能的所有权限 –>
AmazonS3FullAccess - ses 功能的所有权限 –
AmazonSESFullAccess
因为这个 develop 用户拥有的权限太大了, 一旦 key+secret 泄露了, 黑客就可以通过类似于 aws-cli 的命令行工具来做一些不好的事情,比如:
- 往 s3 上的 bucket 随意上传某些木马文件
- 修改 s3 bucket 的 acl 权限,将所有的 bucket 都改成公开桶,直接暴露在外网,或者给自己插入一个另一个账号的登录后门
- 直接使用 ses 发送垃圾邮件,然后受到投诉过多之后,就会可能导致这个 aws 账号被封禁
- 删除 dynamodb 的记录或者表
因此我们必须在后端开发中,根据具体项目所使用到的 aws 的功能,尽可能做最小化的权限分配,并且要设置请求的 ip 白名单,这样子一来,哪怕不小心这个用户的 key+secret 泄露了,我们也不用担心会造成太大的影响。
当然最重要的是,这些用于后端开发的 key,一定要定时更换,最好是 3 个月或者 6 个月替换一次,这样子可以更加的安全。
接下来我们做一下将原先的 develop 用户的权限,拆分开来,拆分成这 3 个用户来替换:
develop_uc-> 承载 s3 的上传下载 (正常公开桶的下载不需要特意设置权限,但是如果是未公开桶的下载,尤其是有过期时间的那种,是需要走 key+secret 的签名然后生成下载链接的)develop_ses-> 承载邮件的发送develop_dynamodb-> 承载 dynamodb 相关功能
然后最好各自都要设置 ip 白名单的策略,防止一旦真的泄露的,也可以让黑客无法访问
接下来各自实践一下这个过程,并且通过 aws-cli 来模拟接口行为。
接入 develop_ses 用户
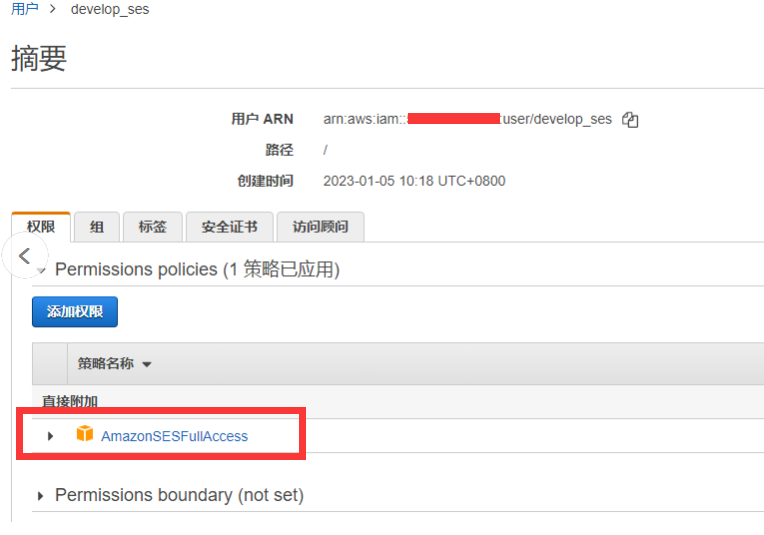
开始我们直接在 aws 的后台创建一个叫 develop_ses 的用户,并且只赋予 ses 的策略权限 (这个策略是本身 aws 有提供的,不需要我们自己建)
接下来我们就可以用 aws-cli 工具测试一下 (首先要先通过 aws configure 来配置这个用户的 key+secret)1
2
3
4
5
6
7
8
9
10
11
12
13
14
15
16
17
18
19
20
21# 发送邮件
$ aws ses send-email --from no-reply@example.com --to kebingzao@gmail.com --subject hello --text "hello zach2"
{
"MessageId": "0100018580c912a1-eef4adcf-3a9a-4e01-b0de-7afe0a628950-000000"
}
# 获取某一个 bucket 的 policy 策略
$ aws s3api get-bucket-policy --bucket feedback-example
An error occurred (AccessDenied) when calling the GetBucketPolicy operation: Access Denied
# 列出 s3 的所有 bucket
$ aws s3 ls
An error occurred (AccessDenied) when calling the ListBuckets operation: Access Denied
# 获取某一个 bucket 的 acl 权限
$ aws s3api get-bucket-acl --bucket feedback-example
An error occurred (AccessDenied) when calling the GetBucketAcl operation: Access Denied
# 删除某一个bucket的某一个对象
$ aws s3api delete-object --bucket test-kbz --key zach1.jpg
An error occurred (AccessDenied) when calling the DeleteObject operation: Access Denied
可以看到除了发送邮件可以之外, 其他的 s3 的操作,都没有权限, 这个是对的。
附加 ip 白名单策略,限制该角色的操作 ip
接下来我们在 aws 后台添加一个策略,叫做 ses_deny_ip, 用来限制使用 ses 功能的角色的 ip 白名单
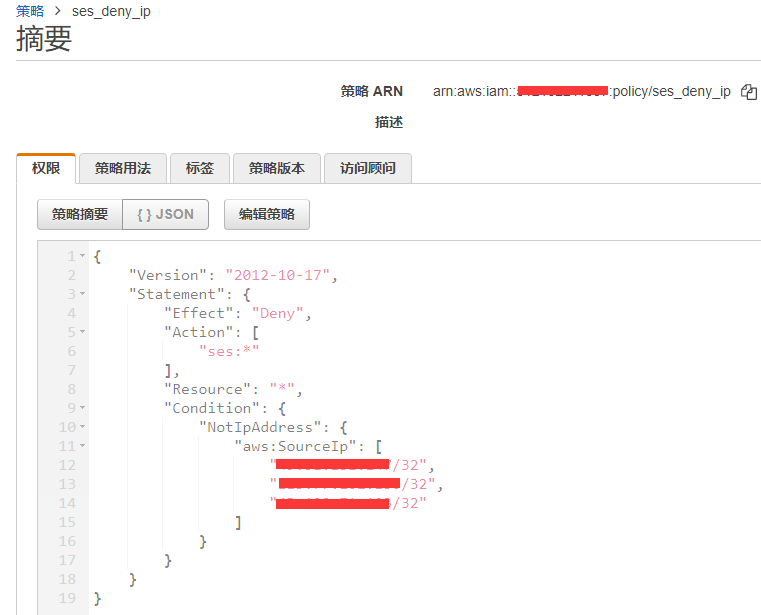
上面的白名单,并没有包含我的本机测试的外网 ip,所以就可以看到,之前可以成功发送的邮件,现在也都失败,提示没有权限1
2$ aws ses send-email --from no-reply@example.com --to kebingzao@gmail.com --subject hello --text "hello zach4"
An error occurred (AccessDenied) when calling the SendEmail operation: User `arn:aws:iam::5166688837:user/develop_ses' is not authorized to perform `ses:SendEmail' on resource `arn:aws:ses:us-east-1:5166688837:identity/no-reply@example.com'
所以最后赋予这个 develop_ses 用户的策略就是这两个:
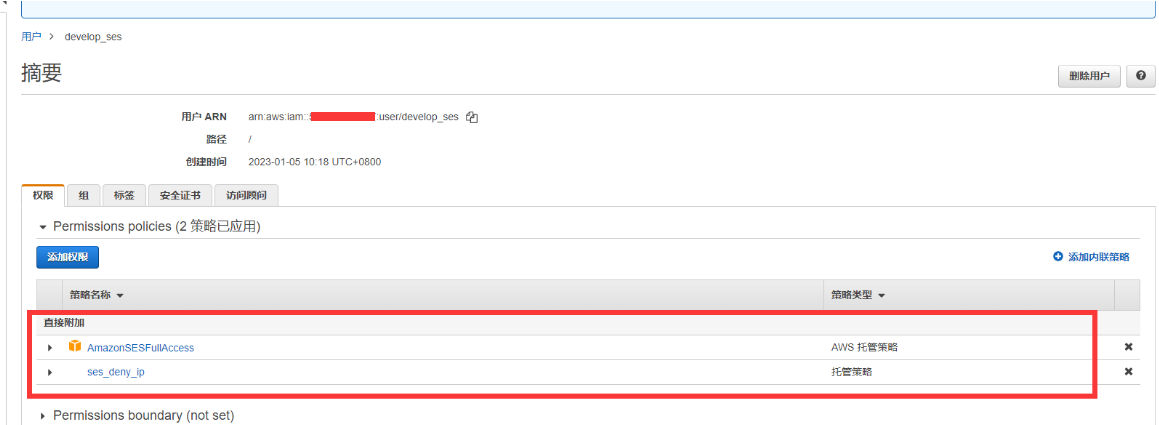
这两个策略,一个是权限策略,表示这个角色只能用 ses 的功能, 一个是限制策略, 表示只有 ip 白名单内的 ip 登录这个用户,才能使用
接入 develop_dynamodb 用户
跟之前的做法一样, 我们一样建了 develop_dynamodb 用户,然后并赋予了两个策略,一个表示这个角色只能使用 dynamodb 的功能, 一个是表示只有 ip 白名单内的 ip 登录这个用户,才能使用

类似的情况,上面的 develop_ses 其实已经有描述了,这边不再赘述, 贴出使用 aws-cli 的测试结果1
2
3
4
5
6
7
8
9
10
11
12
13
14
15
16
17
18
19
20
21
22
23
24
25
26
27
28
29
30
31
32
33
34
35
36
37
38
39
40
41
42
43
44
45
46
47
48
49
50
51
52
53
54
55
56
57
58
59
60
61
62
63
64
65
66
67
68
69
70
71
72
73
74
75
76
77
78
79
80
81
82
83
84
85
86
87
88
89
90
91
92
93
94
95
96
97
98
99
100
101
102
103
104
105
106
107
108
109
110
111
112
113
114
115
116
117
118
119
120
121
122
123
124
125
126
127
128
129
130
131
132
133
134
135
136
137
138
139
140
141
142
143
144
145
146
147
148
149
150
151
152
153
154
155# 没有 s3 bucket 的索引权限
$ aws s3 ls
An error occurred (AccessDenied) when calling the ListBuckets operation: Access Denied
# 也没有某一个 bucket 的删除 object 权限
$ aws s3api delete-object --bucket test-kbz --key zach1.jpg
An error occurred (AccessDenied) when calling the DeleteObject operation: Access Denied
# 也没有 ses 的发送权限
$ aws ses send-email --from no-reply@example.com --to kebingzao@gmail.com --subject hello --text "hello zach2"
An error occurred (AccessDenied) when calling the SendEmail operation: User `arn:aws:iam::5166688837:user/develop_dynamodb' is not authorized to perform `ses:SendEmail' on resource `arn:aws:ses:us-west-1:5166688837:identity/kebingzao@gmail.com'
# 根据 uid 查询某一个用户的所有记录
$ aws dynamodb query --table-name team_msg --key-condition-expression "#kn0=:kv0" --expression-attribute-names '{"#kn0": "uid"}' --expression-attribute-values '{":kv0": {"N": "25677003"}}' --return-consumed-capacity TOTAL
{
"Items": [
{
"is_sent": {
"N": "1"
},
"fid": {
"N": "2467749"
},
"msg": {
"S": "66666"
},
"collect_from": {
"N": "2"
},
"app_ver": {
"S": "3.6.4.0"
},
"pid": {
"N": "1557891486797"
},
"device_type": {
"N": "2"
},
"nick_name": {
"S": "ffff"
},
"msg_type": {
"N": "2"
},
"uid": {
"N": "25677003"
},
"create_date": {
"S": "2019-05-15 03:38:06"
}
},
... 省略后面 9 条记录
],
"Count": 10,
"ScannedCount": 10,
"ConsumedCapacity": {
"TableName": "team_msg",
"CapacityUnits": 0.5
}
}
# 查询,根据 uid 和 pid 查询某一条记录
$ aws dynamodb query --table-name team_msg --key-condition-expression "#kn0=:kv0 AND #kn1=:kv1" --expression-attribute-names '{"#kn0": "uid", "#kn1": "pid"}' --expression-attribute-values '{":kv0": {"N": "25677003"}, ":kv1": {"N": "1674010228810"}}' --return-consumed-capacity TOTAL
{
"Items": [
{
"is_sent": {
"N": "1"
},
"fid": {
"N": "2467749"
},
"collect_from": {
"N": "2"
},
"app_ver": {
"S": "3.7.0.0"
},
"pid": {
"N": "1674010228810"
},
"device_type": {
"N": "2"
},
"nick_name": {
"S": "ffff"
},
"msg_type": {
"N": "1"
},
"uid": {
"N": "25677003"
},
"create_date": {
"S": "2023-01-18 02:50:28"
},
"file_key": {
"S": "25677003_2467749_1674010223259191901.png"
}
}
],
"Count": 1,
"ScannedCount": 1,
"ConsumedCapacity": {
"TableName": "team_msg",
"CapacityUnits": 0.5
}
}
# 使用 get-item 获取某条记录, 但是一定要传 分区键(uid) 和 排序键(pid)
$ aws dynamodb get-item --table-name team_msg --key '{"uid": {"N": "25677003"}, "pid": {"N": "1674010228810"}}' --return-consumed-capacity TOTAL {
"Item": {
"is_sent": {
"N": "1"
},
"fid": {
"N": "2467749"
},
"collect_from": {
"N": "2"
},
"app_ver": {
"S": "3.7.0.0"
},
"pid": {
"N": "1674010228810"
},
"device_type": {
"N": "2"
},
"nick_name": {
"S": "ffff"
},
"msg_type": {
"N": "1"
},
"uid": {
"N": "25677003"
},
"create_date": {
"S": "2023-01-18 02:50:28"
},
"file_key": {
"S": "25677003_2467749_1674010223259191901.png"
}
},
"ConsumedCapacity": {
"TableName": "team_msg",
"CapacityUnits": 0.5
}
}
# 如果执行 ip 不在白名单之内的话,就会报错
$ aws dynamodb get-item --table-name team_msg --key '{"uid": {"N": "46783674"}, "fid": {"N": "2467749"}}' --return-consumed-capacity TOTAL
An error occurred (AccessDeniedException) when calling the GetItem operation: User: arn:aws:iam::5166688837:user/develop_dynamodb is not authorized to perform: dynamodb:GetItem on resource: arn:aws:dynamodb:us-west-1:5166688837:table/team_msg with an explicit deny in an identity-based policy
添加的 ip 白名单的策略:1
2
3
4
5
6
7
8
9
10
11
12
13
14
15
16
17
18{
"Version": "2012-10-17",
"Statement": {
"Effect": "Deny",
"Action": [
"*"
],
"Resource": "*",
"Condition": {
"NotIpAddress": {
"aws:SourceIp": [
"43.xx.xx.xx/32",
"49.xx.xx.xx/32"
]
}
}
}
}
接入 develop_uc 用户
这个用户主要用于承担某些 s3 bucket 的上传下载行为,因此我们要做到最小化的策略管控,不能直接给 s3 的所有权限,用到几个 bucket,我们就给几个 bucket,用到哪些 api,我们就只给这几个 api, 多一个都不行。
通过 AWS Policy Generator, 我们可以很快生成这个策略:1
2
3
4
5
6
7
8
9
10
11
12
13
14
15
16
17
18
19
20
21
22{
"Id": "Policy1673424131664",
"Version": "2012-10-17",
"Statement": [
{
"Sid": "Stmt1673424121459",
"Action": [
"s3:GetObject",
"s3:GetObjectAcl",
"s3:GetObjectAttributes",
"s3:PutObject",
"s3:PutObjectAcl"
],
"Effect": "Allow",
"Resource": [
"arn:aws:s3:::mybucket-1/*",
"arn:aws:s3:::mybucket-2/*",
"arn:aws:s3:::mybucket-3/*"
]
}
]
}
他的这个 resource 可以非常细,甚至可以定位到某一个 bucket 的某一个目录,或者某一个 object 对象,只不过对于本例来说,只给这个 bucket 就够了
action 方面,一般我们就是用于上传和生成受限制的下载链接,所以上述这几个 api 其实就够了,一些很危险的比如
put-bucket-acl这种,绝对不能给
接下来试一下策略结果:1
2
3
4
5
6
7
8
9
10
11
12
13
14
15
16
17
18
19
20
21
22
23
24
25
26
27
28
29
30
31
32
33
34
35
36
37
38
39
40
41
42
43
44
45
46
47
48
49
50
51
52
53
54
55
56
57
58
59
60
61
62
63
64
65
66
67
68
69# 上传一个对象,并且设置 acl 策略
$ aws s3api put-object --bucket mybucket-1 --key zach11.jpg --body e:/tmp/zach1.jpg --acl public-read-write
{
"ETag": "\"743a89a2687d7f634956844c5b6c2720\""
}
# 获取对象的 acl 策略
$ aws s3api get-object-acl --bucket mybucket-1 --key zach11.jpg
{
"Owner": {
"DisplayName": "814087434",
"ID": "01837f398501a862514659c4e8c7b0cc9abcba1c3fc4ecfb6ede19bdb86def4f"
},
"Grants": [
{
"Grantee": {
"DisplayName": "814087434",
"ID": "01837f398501a862514659c4e8c7b0cc9abcba1c3fc4ecfb6ede19bdb86def4f",
"Type": "CanonicalUser"
},
"Permission": "FULL_CONTROL"
},
{
"Grantee": {
"Type": "Group",
"URI": "http://acs.amazonaws.com/groups/global/AllUsers"
},
"Permission": "READ"
},
{
"Grantee": {
"Type": "Group",
"URI": "http://acs.amazonaws.com/groups/global/AllUsers"
},
"Permission": "WRITE"
}
]
}
# 上传文件并且设置 content-type 的值
$ aws s3api put-object --bucket mybucket-1 --key test.htm --body e:/tmp/test.htm --content-type text/html
{
"ETag": "\"3b366df5ffc28c87f878fbda7e36cb42\""
}
# ses 发送邮件不行
$ aws ses send-email --from no-reply@example.com --to kebingzao@gmail.com --subject hello --text "hello zach5"
An error occurred (AccessDenied) when calling the SendEmail operation: User `arn:aws:iam::5166688837:user/develop_lambda' is not authorized to perform `ses:SendEmail' on resource `arn:aws:ses:us-east-1:5166688837:identity/no-reply@example.com'
# 删除 bucket 对象也不行
$ aws s3api delete-object --bucket mybucket-1 --key zach1.jpg
An error occurred (AccessDenied) when calling the DeleteObject operation: Access Denied
# 列出 s3 bucket 索引也不行
$ aws s3 ls
An error occurred (AccessDenied) when calling the ListBuckets operation: Access Denied
# 连这个 bucket 的索引权限都没有
$ aws s3 ls s3://mybucket-1
An error occurred (AccessDenied) when calling the ListObjectsV2 operation: Access Denied
# 带 acl 的上传也是可以的
$ aws s3api put-object --bucket mybucket-1 --key test_zach1.jpg --body e:/tmp/zach1.jpg --acl public-read --content-type image/jpeg
{
"ETag": "\"743a89a2687d7f634956844c5b6c2720\""
}
# 下载对象是可以的
$ aws s3api get-object --bucket mybucket-1 --key test_zach1.jpg e:/tmp/11.jpg
添加 ip 白名单会有问题
刚开始也是一样给这个用户添加了一个 ip 白名单的策略,上面只有我们线上和测试服的服务器的外网 ip。
但是在测试过程发现了一个问题,就是我们的接口会通过 aws 的签名算法下发给客户端的 auth token,然后让客户端自己去上传,这样子一来可以节省服务端的资源,另一方面因为云存储我们国内走 七牛,国外走 s3, 所以客户端可以根据他们的地区自己选择要上传的方式。
但是发现客户端在得到服务端下发的 auth token 之后,然后再调用 aws 的 sdk 上传之后,会报 403 的错误
为此我还写了一个 demo 来测试, 这个 demo 去请求我们服务器的 auth 接口,然后直接走 post 表单上传:1
2
3
4
5
6
7
8
9
10
11
12
13
14
15
16
17
18
19
20
21
22
23
24
25
26
27
28
29
30
31
32
33
34
35
36
37
38
39
40
41
42
43
44
45
46
47
48
49
50
51
52
53
54
55
56
57
58
59
60
61
62
63
64
65
66
67
68
69
70
71
72
73
74
75
76
77
78var requestLib = require('request');
const fs = require('fs')
const accountId = 1866666641
const fileName = 'zach1.jpg'
let url = `https://test.example.com/upload/auth?a=${accountId}&filename=${fileName}`
function getUploadTokenAndUpload(){
requestLib({
url: url,
method: "GET",
},function (error, response, body){
console.error('error:', error); // Print the error if one occurred
console.log('statusCode:', response && response.statusCode); // Print the response status code if a response was received
if(response && response.statusCode == 200){
console.log("get token success!!!")
}
console.log('body:', body);
let uploadInfo = JSON.parse(body.substr(1, body.length-2))
console.log('uploadInfo:', JSON.stringify(uploadInfo))
// 进行上传
uploadFile(uploadInfo)
});
}
// let uploadInfo = {
// "avatar_url": "https://my-test.s3.amazonaws.com/1866666641_160.jpg",
// "cloud": "a",
// "data": {
// "form_action": "https://my-test.s3.amazonaws.com",
// "key": "1866666641_160.jpg",
// "acl": "public-read",
// "x_amz_credential": "Axxxxxxxxxxxxx67/20230104/us-east-1/s3/aws4_request",
// "x_amz_algorithm": "AWS4-HMAC-SHA256",
// "x_amz_date": "20230104T000000Z",
// "Content-Diposition": "",
// "policy": "ewogICAxxxxxxxxxxxxxxxxxxxxxxxxxxxxxxxxxImtleSI6xxxxxxxxxxxxxMjY0MV8xNjAuanBnIn0xxxxxxxxxxxxxxxxxxxxxxxxhdGFyLWFpcmRyb2lkLXRlc3QifSwKICAgICAgICB7ImFjbCI6ICJwdWJsaWMtcmVhZCJ9LAogICAgICAgIHsieC1hbXotYWxnb3JpdGhtIjogIkFXUzQtSE1BQy1TSEEyNTYifSwKICAgICAgICB7IngtYW16LWNyZWRlbnRpYWwiOiAiQUtJQVhPUFZHU0JJWEUyVVBMNjcvMjAyMzAxMDQvdXMtZWFzdC0xL3MzL2F3czRfcmVxdWVzdCJ9LAogICAgICAgIHsieC1hbXotZGF0ZSI6ICIyMDIzMDEwNFQwMDAwMDBaIn0KICAgIF0KfQ==",
// "x_amz_signature": "a632e4c1xxxxxxxxxxxxec40d7d8efxxxxxxxxxxxxxxxxxxxxxx76e2",
// "success_action_redirect": ""
// },
// "token": "d26xxxxxxxxxxxxxxxxx366ea8"
// }
// 上传
function uploadFile(uploadInfo){
uploadInfo = uploadInfo['data'];
let action = uploadInfo['form_action'];
let data = {
'key': uploadInfo['key'],
'acl': uploadInfo['acl'],
'X-Amz-Credential': uploadInfo['x_amz_credential'],
'X-Amz-Algorithm': uploadInfo['x_amz_algorithm'],
'X-Amz-Date': uploadInfo['x_amz_date'],
'Policy': uploadInfo['policy'],
'X-Amz-Signature': uploadInfo['x_amz_signature'],
};
data['file'] = fs.createReadStream('./' + fileName)
requestLib({
url: action,
method: "POST",
headers: {
'Content-Type': 'multipart/form-data'
},
formData: data
},function (error, response, body){
console.error('error:', error); // Print the error if one occurred
console.log('statusCode:', response && response.statusCode); // Print the response status code if a response was received
if(response && (response.statusCode == 200 || response.statusCode == 204)){
console.log("upload success!!!")
}
console.log('body:', body);
});
}
getUploadTokenAndUpload()
结果因为我的本机出口不在 ip 白名单内,导致虽然拿到了后端返回的 auth info,依然没办法上传到 s3 的 bucket 上,会报 403 (Access Denied) 的错误。
但是一旦将我的本机 ip 加入到 ip 白名单策略中,就可以正常上传成功。
后面查了一下,发现我们这种使用 key+secret 的调用是基于 IAM 的方式进行调用的,客户端基于签名实际上也是基于 aksk 加服务的签名4算法进行的,本质上依然是基于 IAM 进行调用的,所以会受到 ip 白名单的策略限制。
所以如果是基于服务端下发 upload token,然后让客户端自己去进行上传的,那么就没办法应用 ip 白名单的策略方式,不过有两种解决方式可供参考:
- 一个是继续走 IAM 授权, 但是在 aws sdk 的调用上,要分成服务器上传的 aws 用户角色(也就是本例的
develop_uc),和下发签名给客户端的用户角色 (develop_auth)。 服务器上传的用户角色要设置 ip 白名单, 下发给客户端的用户角色不能设置 ip 白名单,但是因为只有少数几个 bucket 需要允许客户端上传,因此可以指定更具体的 policy 权限策略。 - 第二种方式就是将角色跟 aws 的 EC2 绑定,这样子就不需要走 key+secret 的方式操作了,因为只有关联角色的EC2实例,可以执行角色的权限(也不需要白名单)。好处就是不用担心 key 泄露,因为执行权限的时候,不需要走 key+secret 校验, 坏处就是耦合性太强, 不利于横向扩展和跨平台。
关于 aws 的用户和角色 这两个概念
在 aws 后台中,用户和角色 其实是两个概念, 本次我们创建的这三个都是属于 aws 的用户。
aws 的用户和角色都可以赋予各种各样的策略(Policy), 他们的不同之处在于,用户是可以设置 key+secret 来提供给外部的程序作为 sdk 的权限初始化来使用的,也就是我们现在后端用的这种方式,初始化 sdk 的时候,用的就是这个用户的 key+secret, 这个用户本身所赋予的策略,决定了他可以在 sdk 中做到什么事情。
而角色他是没有生成 key+secret 供外部程序调用的,他一般是用于 aws 各个服务间的调用存在的,因此也更加的安全,因为他不存在泄露 key 的情况。
举个例子,我早期写的这个文章: 项目使用 aws 的 lambda服务来生成s3的缩略图,就是通过使用 aws 的 lambda 程序,将某一个图片生成缩略图并上传到对应的 s3 bucket,这时候我程序在初始化上传程序的时候,并没有向下面那样子还要初始化 key+secret:1
2session = boto3.session.Session(aws_access_key_id=conf.get("s3","access_key"),aws_secret_access_key=conf.get("s3","secret_access_key"))
s3_client = session.client('s3')
而是直接用:1
s3_client = boto3.client('s3')
原因就是因为我这个 lambda 函数,在运行的时候,是可以指定角色的,而我指定了这个内置的角色 lambda-s3-execution-role
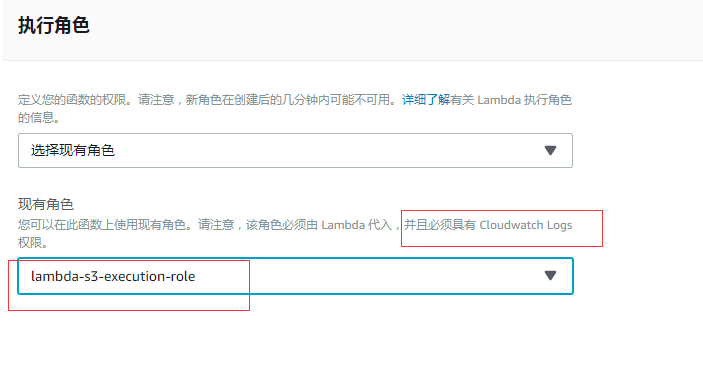
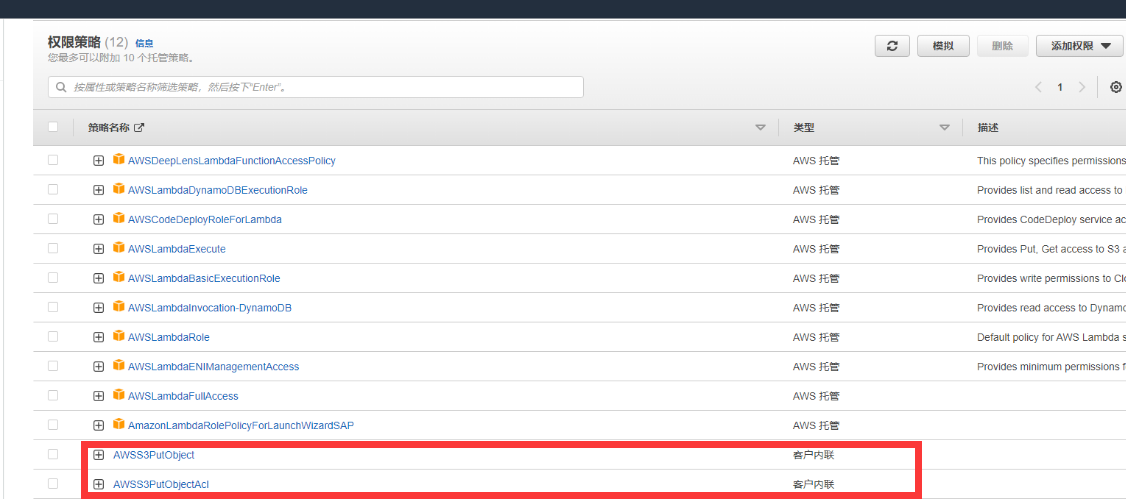
而这个角色所附加的权限策略是有包含 S3 的 put-object 和 put-object-acl 这两个动作的:
因此如果是 aws 内部服务相关调用的情况,那么更安全的应该直接用角色来控制权限。这样子就不会有 key 泄露的安全隐患。
总结
我们通过将 aws 的用户的策略权限根据各自的服务类型进行细分,并且通过添加 ip 白名单的策略,可以很好的防止 key+secret 泄露之后,黑客的非法调用。
参考资料:
- AWS:基于源 IP 拒绝对 AWS 的访问
- Access control list (ACL) overview
- How to Whitelist IP Addresses to Access an AWS S3 Bucket
- 安装或更新最新版本的 AWS CLI
- 通过 AWS CLI 使用高级别 (s3) 命令
- 通过 AWS CLI 使用 API 级 (s3api) 命令
- Amazon S3 存储桶生命周期操作脚本示例
- AWS CLI 所有的 s3api 的指令
- AWS CLI 所有的 s3 的指令(旧版)
- 使用 AWS CLI 发送 ses 邮件
- DynamoDB CLI Commands & Query Examples Cheat Sheet
- AWS CLI 所有的 dynamodb 指令
- dynamodb query 指令
- aws 策略模拟生成工具