前言
之前有通过 CentOS7 Minikube - Kubernetes 单机安装 我们已经可以在 minikube 学习 kubernetes 了, 但是这个毕竟是单机的,后面又通过 使用 play with kubernetes 搭建 5 个节点的集群 线上练习了一下 kubeadm 的集群操作。 本次就用 CentOS7 手动安装 Kubeadm 集群环境。
本文主要是参照官方文档: 使用 kubeadm 创建集群 进行安装,中间遇到问题的时候,有参考了网上的一些文章来解决。
机器准备
准备两台能够科学上网的机器(选用的是 腾讯云 美西的机器),一台用作 master 节点, 一台用于集群的 worker 节点。 (集群最低要求就是两台,一台 master,一台 工作节点,如果两台都可以了,那么扩展成 3台, 4台 都是没有问题的)
| 环境参数 | 值 |
|---|---|
| 系统 | CentOS 7 |
| CPU | 2 核 |
| 内存 | 4 G |
| 能否科学上网 | 能 (腾讯云位于美西的机器) |
| kubernetes 版本 | v1.19.3 |
这两台的内网 ip:
- 172.26.64.9 k8s-master
- 172.26.64.2 k8s-node-2
每一台的环境都要先配置
1. 关闭防火墙 / 开放端口
1 | [root@VM-64-9-centos ~]# systemctl stop firewalld |
关闭防火墙主要是为了让端口开放,按照官方文档,这些端口都会用到,都不要限制的。
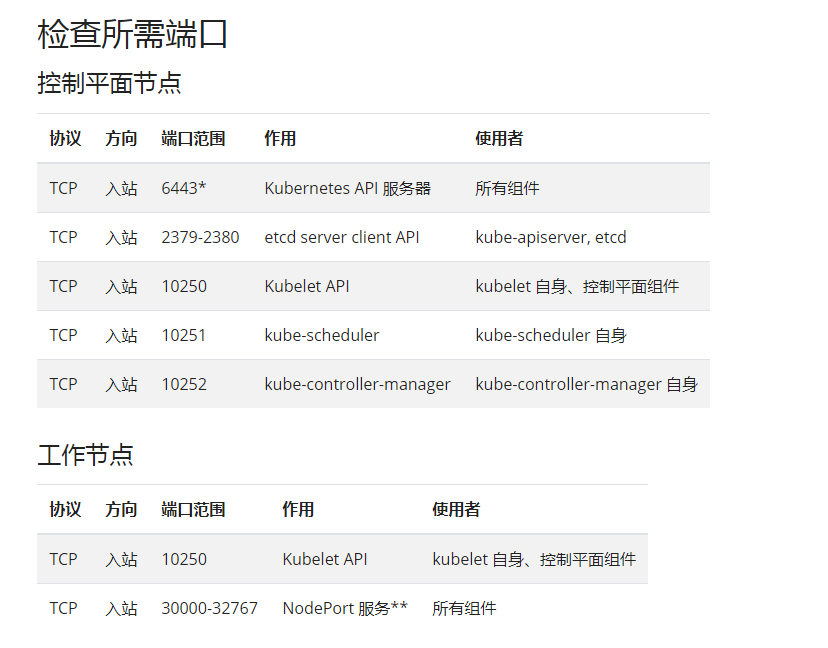
如果是云服务器的话,那么就要在安全组那边将这几台的端口都开放:

2. 禁用SELinux
1 | [root@VM-64-9-centos ~]# sed -i 's/enforcing/disabled/' /etc/selinux/config |
3. 关闭Swap (注释或删除swap行,永久关闭)
1 |
|
上面是注释掉,永久关闭,也可以临时关闭:1
swapoff -a
4. 修改主机名
1 | [root@VM-64-9-centos ~]# hostnamectl set-hostname k8s-master |
这个步骤也可以不要,因为无论是 init 还是 join 指令,都可以通过 --name-node 参数来指定 master 或者 node 节点的名称。
5. 将桥接的IPv4流量传递到iptables链【CentOS必须做这一步】
指令:1
2
3
4
5cat > /etc/sysctl.d/k8s.conf << EOF
net.bridge.bridge-nf-call-ip6tables = 1
net.bridge.bridge-nf-call-iptables = 1
net.ipv4.ip_forward = 1
EOF
执行:1
2
3
4
5
6[root@VM-64-9-centos ~]# cat > /etc/sysctl.d/k8s.conf << EOF
> net.bridge.bridge-nf-call-ip6tables = 1
> net.bridge.bridge-nf-call-iptables = 1
> net.ipv4.ip_forward = 1
> EOF
[root@VM-64-9-centos ~]# sysctl --system
这个 net.ipv4.ip_forward = 1 这一行有没有加好像没啥影响,我试过去掉也是可以的,官方文档就没有加这一句, 官网的方式是:1
2
3
4
5
6
7
8[root@VM-64-7-centos ~]# cat <<EOF > /etc/sysctl.d/k8s.conf
> net.bridge.bridge-nf-call-ip6tables = 1
> net.bridge.bridge-nf-call-iptables = 1
> EOF
[root@VM-64-7-centos ~]# modprobe br_netfilter
[root@VM-64-7-centos ~]# sysctl -p /etc/sysctl.d/k8s.conf
net.bridge.bridge-nf-call-ip6tables = 1
net.bridge.bridge-nf-call-iptables = 1
以上两种,我都尝试过,都是可以的, 任选一种处理。
6. 安装docker-ce / docker
安装docker-ce1
2
3
4
5
6[root@VM-64-9-centos ~]# yum-config-manager --add-repo https://mirrors.aliyun.com/docker-ce/linux/centos/docker-ce.repo
[root@VM-64-9-centos ~]# yum makecache fast
[root@VM-64-9-centos ~]# yum -y install docker-ce
[root@VM-64-9-centos ~]# systemctl enable docker
[root@VM-64-9-centos ~]# systemctl start docker
[root@VM-64-9-centos ~]# docker -v
这个我试了一下, 不需要一定要安装 docker-ce, 有一次我换成安装 docker, 好像也没啥毛病 (暂时没搞懂这两个的差别,不过我两个都试过,都可以 work 的)1
2
3[root@VM-64-7-centos ~]# yum install -y docker
[root@VM-64-7-centos ~]# systemctl start docker.service
[root@VM-64-7-centos ~]# systemctl enable docker.service
所以上面两种任选一种,我都试过,都可以。
7. 安装 kubeadm, kubectl, kubelet
指令:1
2
3
4
5
6
7
8
9cat <<EOF > /etc/yum.repos.d/kubernetes.repo
[kubernetes]
name=Kubernetes
baseurl=https://packages.cloud.google.com/yum/repos/kubernetes-el7-x86_64
enabled=1
gpgcheck=1
repo_gpgcheck=1
gpgkey=https://packages.cloud.google.com/yum/doc/yum-key.gpg https://packages.cloud.google.com/yum/doc/rpm-package-key.gpg
EOF
执行:1
2
3
4
5
6
7
8
9
10
11
12
13[root@VM-64-9-centos ~]# cat <<EOF > /etc/yum.repos.d/kubernetes.repo
> [kubernetes]
> name=Kubernetes
> baseurl=https://packages.cloud.google.com/yum/repos/kubernetes-el7-x86_64
> enabled=1
> gpgcheck=1
> repo_gpgcheck=1
> gpgkey=https://packages.cloud.google.com/yum/doc/yum-key.gpg https://packages.cloud.google.com/yum/doc/rpm-package-key.gpg
> EOF
[root@VM-64-9-centos ~]# yum install -y kubelet kubeadm kubectl --disableexcludes=kubernetes
[root@VM-64-9-centos ~]# systemctl enable --now kubelet
master 节点操作
1. master 初始化集群
指令:1
kubeadm init --kubernetes-version=v1.19.3 --service-cidr=10.1.0.0/16 --pod-network-cidr=10.244.0.0/16 --apiserver-advertise-address=172.26.64.9
执行:1
2
3
4
5
6
7
8
9[root@VM-64-9-centos ~]# kubeadm init --kubernetes-version=v1.19.3 --service-cidr=10.1.0.0/16 --pod-network-cidr=10.244.0.0/16 --apiserver-advertise-address=172.26.64.9
W1029 14:19:50.148694 6460 configset.go:348] WARNING: kubeadm cannot validate component configs for API groups [kubelet.config.k8s.io kubeproxy.config.k8s.io]
[init] Using Kubernetes version: v1.19.3
...
Then you can join any number of worker nodes by running the following on each as root:
kubeadm join 172.26.64.9:6443 --token m254rm.e96fmjeudmaui6gj \
--discovery-token-ca-cert-hash sha256:28df6ce879d5f79685eaffaf37f0452f9f3bed675a5a53058cdc7f0ccf6aab77
这样子就初始化好了。 这边要注意两个细节的是, 其中一个是 --apiserver-advertise-address 这个就是 master 本机的内网 ip, 另一个就是这边有两个参数 --service-cidr 和 --pod-network-cidr, 刚开始以为后面的值是 master 的网关, 结果后面填了网关之后,就会出现集群是成功了,但是有时候会出现 master 或者 node 安装的服务, 明明端口已经启动监听了,但是就是连不上, 后面找了很久,才知道是这两个参数的设置问题,最后结合网上的一些参考文章,才改成最后这个 (应该是可以写死的)。 参数参考文档: kubeadm init
2. 设置访问权限
这时候执行 get nodes 指令是没有访问权限的,1
2[root@VM-64-9-centos ~]# kubectl get nodes
The connection to the server localhost:8080 was refused - did you specify the right host or port?
所以要设置一下这个用户的访问权限 (root用户和普通用户都可以)1
2
3[root@VM-64-9-centos ~]# mkdir -p $HOME/.kube
[root@VM-64-9-centos ~]# sudo cp -i /etc/kubernetes/admin.conf $HOME/.kube/config
[root@VM-64-9-centos ~]# sudo chown $(id -u):$(id -g) $HOME/.kube/config
这样子就可以了:1
2
3[root@VM-64-9-centos ~]# kubectl get nodes
NAME STATUS ROLES AGE VERSION
k8s-master NotReady master 50s v1.19.3
3. 安装 pod 网络插件
我们可以看到上面的 master 节点的状态是 not ready,这个是因为我们并没有安装网络插件,接下来安装一下
指令:1
kubectl apply -f https://raw.githubusercontent.com/coreos/flannel/2140ac876ef134e0ed5af15c65e414cf26827915/Documentation/kube-flannel.yml
执行:1
2
3
4
5
6
7
8
9
10
11
12
13[root@VM-64-9-centos ~]# kubectl apply -f https://raw.githubusercontent.com/coreos/flannel/2140ac876ef134e0ed5af15c65e414cf26827915/Documentation/kube-flannel.yml
podsecuritypolicy.policy/psp.flannel.unprivileged created
Warning: rbac.authorization.k8s.io/v1beta1 ClusterRole is deprecated in v1.17+, unavailable in v1.22+; use rbac.authorization.k8s.io/v1 ClusterRole
clusterrole.rbac.authorization.k8s.io/flannel created
Warning: rbac.authorization.k8s.io/v1beta1 ClusterRoleBinding is deprecated in v1.17+, unavailable in v1.22+; use rbac.authorization.k8s.io/v1 ClusterRoleBinding
clusterrolebinding.rbac.authorization.k8s.io/flannel created
serviceaccount/flannel created
configmap/kube-flannel-cfg created
daemonset.apps/kube-flannel-ds-amd64 created
daemonset.apps/kube-flannel-ds-arm64 created
daemonset.apps/kube-flannel-ds-arm created
daemonset.apps/kube-flannel-ds-ppc64le created
daemonset.apps/kube-flannel-ds-s390x created
可以查看 flannel 是否有运行起来:1
2[root@VM-64-9-centos ~]# ps -ef|grep flannel|grep -v grep
root 28099 28082 0 Oct26 ? 00:01:06 /opt/bin/flanneld --ip-masq --kube-subnet-mgr
这时候就变成 ready 了1
2
3[root@VM-64-9-centos ~]# kubectl get nodes
NAME STATUS ROLES AGE VERSION
k8s-master Ready master 2m25s v1.19.3
这边要注意一个细节, master 本身在 init 集群的时候,就加入到这个集群了, 所以不需要在 master 上再执行 join 操作, join 操作是在 node 节点加入集群的时候用的。
node 节点加入集群
接下来我们将另一台 node 节点加入到集群,可以先改一下 hostname1
[root@VM-64-2-centos ~]# hostnamectl set-hostname k8s-node-2
也可以不改,因为加入集群的时候,也可以指定节点名 --node-name string 这样子更灵活。具体参数文档可以看: kubeadm join
指令就是集群初始化后,打印出来的那最后一串。
1 | [root@VM-64-2-centos ~]# kubeadm join 172.26.64.9:6443 --token m254rm.e96fmjeudmaui6gj \ |
上面有一个细节,就是会报一个 warning :1
[WARNING IsDockerSystemdCheck]: detected "cgroupfs" as the Docker cgroup driver. The recommended driver is "systemd". Please follow the guide at https://kubernetes.io/docs/setup/cri/
这个是因为本次实践我是用 docker-ce 安装的, 而它的 cgroup-driver 是 cgroupfs1
2[root@worker-2 ~]# docker info | grep Cgroup
Cgroup Driver: cgroupfs
而 kubelet 的配置参数 --cgroup-driver 是 systemd, 两者不一样,所以报了这个 warning。 (我那时候是没管它,因为不是 error)
不过我后面单独用 docker 安装的时候,它的 cgroup-driver 是 systemd, 跟 kubelet 一致, 他就没有这个 warning 了。1
2
3[root@VM-64-15-centos ~]# docker info | grep Cgroup
WARNING: You're not using the default seccomp profile
Cgroup Driver: systemd
这时候集群就成功了。 在 master 上查看正常1
2
3
4[root@VM-64-9-centos ~]# kubectl get nodes
NAME STATUS ROLES AGE VERSION
k8s-master Ready master 9m44s v1.19.3
k8s-node-2 Ready <none> 73s v1.19.3
token 过期的问题
这边还要注意一个细节,就是 join 集群的时候, token 是有有效期的,token 会在 24 小时后过期,具体查看文档, 所以如果 24 小时候之后,要加入集群的话,就会报这个错误:1
2[preflight] Running pre-flight checks
error execution phase preflight: couldn't validate the identity of the API Server: could not find a JWS signature in the cluster-info ConfigMap for token ID "uyw7tp"
这时候我们就要重新创建一个 token1
2
3
4
5
6[root@VM-64-9-centos ~]# kubeadm token create
W1028 14:54:21.177865 9922 configset.go:348] WARNING: kubeadm cannot validate component configs for API groups [kubelet.config.k8s.io kubeproxy.config.k8s.io]
8tastp.dthdklcvpg0pv1db
[root@VM-64-9-centos ~]# kubeadm token list
TOKEN TTL EXPIRES USAGES DESCRIPTION EXTRA GROUPS
8tastp.dthdklcvpg0pv1db 23h 2020-10-29T14:54:21+08:00 authentication,signing <none> system:bootstrappers:kubeadm:default-node-token
然后用这个 新的 token 重新加入集群就可以了。
验证
接下来安装 nginx 验证一下,集群是否正常1
2
3
4
5[root@VM-64-9-centos ~]# kubectl create deployment nginx --image=nginx
deployment.apps/nginx created
[root@VM-64-9-centos ~]# kubectl get pods
NAME READY STATUS RESTARTS AGE
nginx-6799fc88d8-qvh8n 1/1 Running 0 14s
可以用 describe 查看更详细的 log1
[root@VM-64-9-centos ~]# kubectl describe pod/nginx-6799fc88d8-qvh8n --namespace default
接下来将这个服务暴露出来1
2[root@VM-64-9-centos ~]# kubectl expose deployment nginx --port=80 --type=NodePort
service/nginx exposed
像我们这个就是将容器的 80 端口暴露出来,因为我们没有指定暴露的端口,所以 k8s 会自动帮我们生成一个端口,也就是本例的 32127
而且 type 要选择 NodePort, 作为宿主机的独立服务,可供外界访问, 不能选 ClusterIP, 因为 ClusterIP 是不提供外界访问权限的,只能在本集群内访问。
查看暴露的对应宿主机端口 (上面的指令我们并没有用 --target-port 来指定要暴露的端口,k8s 会帮我们指定一个,所以要查一下)1
2
3[root@VM-64-9-centos ~]# kubectl get po,svc -o wide --all-namespaces=true |grep nginx
default pod/nginx-6799fc88d8-qvh8n 1/1 Running 0 66s 10.244.1.2 k8s-node-2 <none> <none>
default service/nginx NodePort 10.1.136.47 <none> 80:32127/TCP 6s app=nginx
可以看到是端口 32127 端口。
用 node 节点的内网地址访问一下:1
2
3
4
5
6[root@VM-64-9-centos ~]# curl 172.26.64.2:32127
<!DOCTYPE html>
<html>
<head>
<title>Welcome to nginx!</title>
...
访问正常。 因为是集群,所以任何一个集群内的节点访问也都要正常的(事实上每一个集群的节点都会起 32127 这个服务端口,所以才都可以访问),所以用 master 节点的内网地址访问一下:1
2
3
4
5
6[root@VM-64-9-centos ~]# curl 172.26.64.9:32127
<!DOCTYPE html>
<html>
<head>
<title>Welcome to nginx!</title>
...
也是正常的,说明这个集群是正常的。 接下来我们直接用这两台的外网ip 来访问,看是否正常:1
2
3
4
5
6[root@VM-64-9-centos ~]# curl 170.xx.xx.210:32127
<!DOCTYPE html>
<html>
<head>
<title>Welcome to nginx!</title>
...
1 | [root@VM-64-9-centos ~]# curl 170.xx.xx.167:32127 |
两台的外网 ip 访问也正常。 说明集群是正常的。
按照 dashboard 插件
接下来我们安装 dashboard 插件
首先先下载这个配置文件:1
[root@VM-64-9-centos ~]# wget https://raw.githubusercontent.com/kubernetes/dashboard/v2.0.0/aio/deploy/recommended.yaml
然后对这个文件,进行一下编辑,主要是改了两个地方1
[root@VM-64-9-centos ~]# vim recommended.yaml
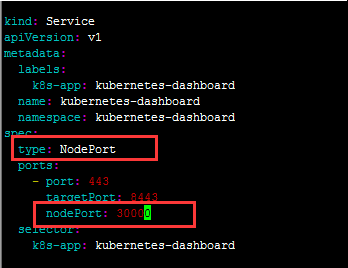
增加 type 为 NodePort 很好理解,因为我们要可以外界访问。 另一个参数 nodePort 就是指定要暴露的端口,如果不指定的话,也行, k8s 会自动生成一个
上面有三个 port 号, nodePort 就是暴露出来的端口, targetPort 就是cluster ip 所对应的端口, 最后的 port 才是对应 pod 的端口。
以上面的例子来说,就是 暴露出 30000 端口,当访问 node 上的 30000 端口的时候, 其请求会转发到 service 对应的 cluster Ip 的 8443 端口,并进一步转发到 pod 的 443 端口。
改完之后,就应用一下:1
[root@VM-64-9-centos ~]# kubectl apply -f recommended.yaml
这样子就创建成功了, 不过要注意一点, dashboard 他的 namespace 并不是 default, 所以直接用 kubectl get pods 是找不到的, 要指定 namespace 才能找到, 或者直接所有的 namespace 都列出来。1
2
3
4
5
6
7
8
9
10
11
12
13
14
15
16
17
18
19
20
21
22
23
24[root@VM-64-9-centos ~]# kubectl get po,svc -o wide --all-namespaces=true
NAMESPACE NAME READY STATUS RESTARTS AGE IP NODE NOMINATED NODE READINESS GATES
default pod/nginx-6799fc88d8-zgzx9 1/1 Running 0 87m 169.254.2.3 vm-64-2-centos <none> <none>
kube-system pod/coredns-f9fd979d6-pm5xm 1/1 Running 0 46h 169.254.0.3 vm-64-9-centos <none> <none>
kube-system pod/coredns-f9fd979d6-q9wpn 1/1 Running 0 46h 169.254.0.2 vm-64-9-centos <none> <none>
kube-system pod/etcd-vm-64-9-centos 1/1 Running 0 46h 172.26.64.9 vm-64-9-centos <none> <none>
kube-system pod/kube-apiserver-vm-64-9-centos 1/1 Running 0 46h 172.26.64.9 vm-64-9-centos <none> <none>
kube-system pod/kube-controller-manager-vm-64-9-centos 1/1 Running 0 46h 172.26.64.9 vm-64-9-centos <none> <none>
kube-system pod/kube-flannel-ds-amd64-48n87 1/1 Running 0 141m 172.26.64.7 vm-64-7-centos <none> <none>
kube-system pod/kube-flannel-ds-amd64-r7bjq 1/1 Running 0 46h 172.26.64.9 vm-64-9-centos <none> <none>
kube-system pod/kube-flannel-ds-amd64-zlhkk 1/1 Running 0 119m 172.26.64.2 vm-64-2-centos <none> <none>
kube-system pod/kube-proxy-c5bws 1/1 Running 0 119m 172.26.64.2 vm-64-2-centos <none> <none>
kube-system pod/kube-proxy-p58k4 1/1 Running 0 141m 172.26.64.7 vm-64-7-centos <none> <none>
kube-system pod/kube-proxy-zhkkc 1/1 Running 0 46h 172.26.64.9 vm-64-9-centos <none> <none>
kube-system pod/kube-scheduler-vm-64-9-centos 1/1 Running 0 46h 172.26.64.9 vm-64-9-centos <none> <none>
kubernetes-dashboard pod/dashboard-metrics-scraper-7b59f7d4df-cn5hs 1/1 Running 0 17s 169.254.1.5 vm-64-7-centos <none> <none>
kubernetes-dashboard pod/kubernetes-dashboard-74d688b6bc-m8h64 1/1 Running 0 17s 169.254.1.4 vm-64-7-centos <none> <none>
NAMESPACE NAME TYPE CLUSTER-IP EXTERNAL-IP PORT(S) AGE SELECTOR
default service/kubernetes ClusterIP 10.96.0.1 <none> 443/TCP 46h <none>
default service/nginx NodePort 10.101.82.211 <none> 80:31193/TCP 86m app=nginx
kube-system service/kube-dns ClusterIP 10.96.0.10 <none> 53/UDP,53/TCP,9153/TCP 46h k8s-app=kube-dns
kubernetes-dashboard service/dashboard-metrics-scraper ClusterIP 10.96.129.93 <none> 8000/TCP 17s k8s-app=dashboard-metrics-scraper
kubernetes-dashboard service/kubernetes-dashboard NodePort 10.111.41.104 <none> 443:30000/TCP 18s k8s-app=kubernetes-dashboard
可以看到在最后一栏,变成 nodePort 了, 并且暴露的端口,就是刚才设置的 30000。 这边有个细节也要注意,就是这个 node port 端口一定是在区间 30000-32767 内的,不在这个区间里面, apply 的时候会报这个错误 (我第一次将其设置为 8080 的时候):1
The Service "kubernetes-dashboard" is invalid: spec.ports[0].nodePort: Invalid value: 8080: provided port is not in the valid range. The range of valid ports is 30000-32767
所以这时候我们内网ip访问一下1
2
3[root@VM-64-9-centos ~]# curl https://172.26.64.2:30000
curl: (60) Issuer certificate is invalid.
...
1 | [root@VM-64-9-centos ~]# curl https://172.26.64.9:30000 |
集群的两台都正常。接下来试下在浏览器上直接外网访问:
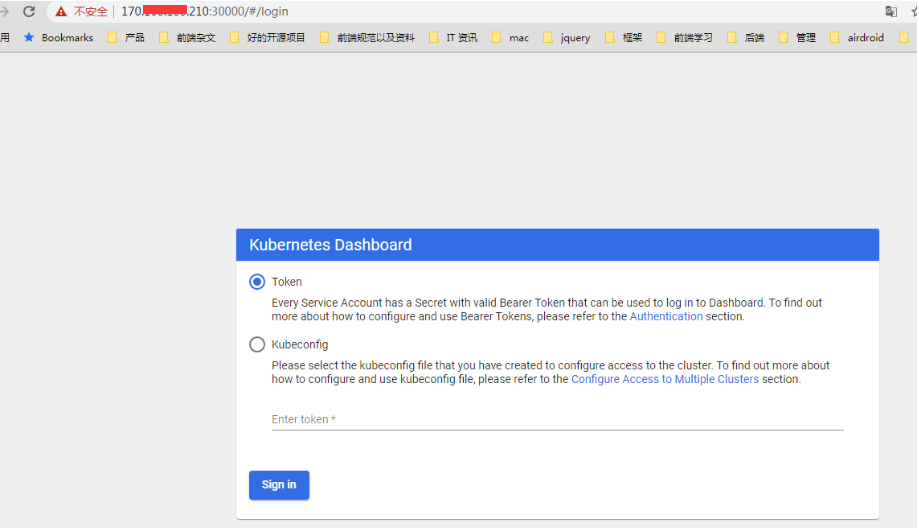
两台也可以正常访问,不过这个要 token 才行,所以我们接下来创建管理员,并赋权,获取 token 登陆 dashboard。1
2
3
4
5
6
7
8
9
10
11
12
13
14
15
16
17
18[root@VM-64-9-centos ~]# kubectl create serviceaccount dashboard-admin -n kube-system
serviceaccount/dashboard-admin created
[root@VM-64-9-centos ~]# kubectl create clusterrolebinding dashboard-admin --clusterrole=cluster-admin --serviceaccount=kube-system:dashboard-admin
clusterrolebinding.rbac.authorization.k8s.io/dashboard-admin created
[root@VM-64-9-centos ~]# kubectl describe secrets -n kube-system $(kubectl -n kube-system get secret | awk '/dashboard-admin/{print $1}')
Name: dashboard-admin-token-b8dtx
Namespace: kube-system
Labels: <none>
Annotations: kubernetes.io/service-account.name: dashboard-admin
kubernetes.io/service-account.uid: 13690c3f-6483-4f9c-b289-9bb1c3833810
Type: kubernetes.io/service-account-token
Data
====
ca.crt: 1066 bytes
namespace: 11 bytes
token: eyJhbGciOiJSUzI1NiIsImtpZCI6IlZ5ZnAxUmFzejJBSE9mVjQ5ZE5HLTdzME82Q2FRdnRmbGJQaVlITnpUR2MifQ.eyJpc3MiOiJrdWJlcm5ldGVzL3NlcnZpY2VhY2NvdW50Iiwia3ViZXJuZXRlcy5pby9zZXJ2aWNlYWNjb3VudC9uYW1lc3BhY2UiOiJrdWJlLXN5c3RlbSIsImt1YmVybmV0ZXMuaW8vc2VydmljZWFjY291bnQvc2VjcmV0Lm5hbWUiOiJkYXNoYm9hcmQtYWRtaW4tdG9rZW4tYjhkdHgiLCJrdWJlcm5ldGVzLmlvL3NlcnZpY2VhY2NvdW50L3NlcnZpY2UtYWNjb3VudC5uYW1lIjoiZGFzaGJvYXJkLWFkbWluIiwia3ViZXJuZXRlcy5pby9zZXJ2aWNlYWNjb3VudC9zZXJ2aWNlLWFjY291bnQudWlkIjoiMTM2OTBjM2YtNjQ4My00ZjljLWIyODktOWJiMWMzODMzODEwIiwic3ViIjoic3lzdGVtOnNlcnZpY2VhY2NvdW50Omt1YmUtc3lzdGVtOmRhc2hib2FyZC1hZG1pbiJ9.q37Vt-7Ytz7hd_qDCBnBP4u2rqOQhztVfemLJYAHW0GQkl3w4lVadfXMvC4-qqxBNtBC2fIpwBWKyy49vu1oTwKb6hlk4SKHY7PotWPekEXQp190OGj4Rjlkx9PnKlJcpzJMLJnZrZJnexXoKPX1Y2w5PIlyqaQyyNre5gVosEfpJbhDNzSr5_8CKimK_pDPb1NZ6sgNf9eKDZhHS17eiAesMuCvoyTSJXzbzxS-vTGsOG-fqfJu5zkXqQ7bi-MSGLdBUGgvieJ0BRntH2aWB9eKo6Brtqi6rizuZpjdki5IbxkOHxKvNSu9a-agLUUz8kL4onikcUvpbu-MtJAj9Q
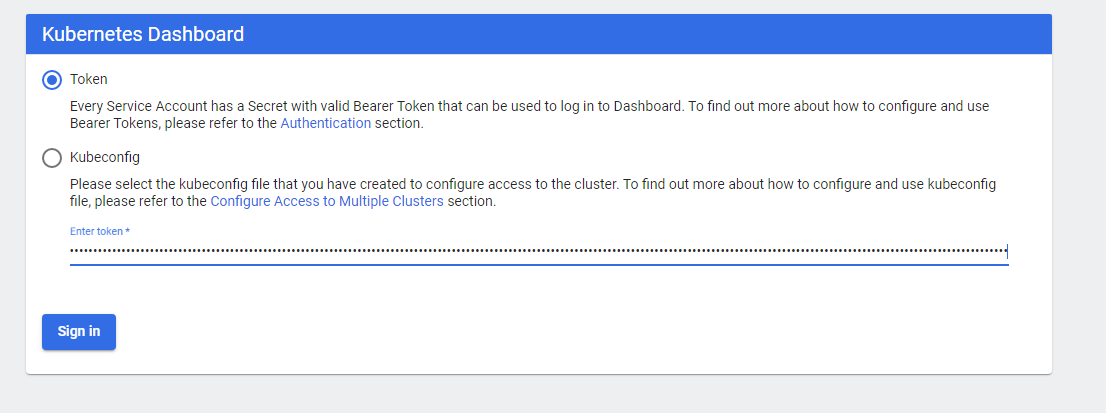
可以看到最后的 token 就是了,将这一串 token 拷贝过去,点击登录
就可以进入后台了
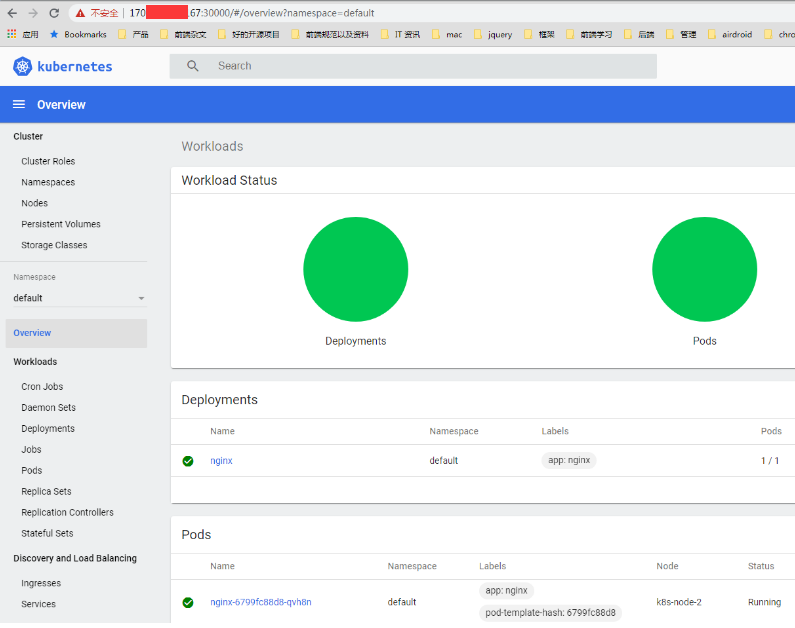
这样子 dashboard 就安装成功了
总结
总的来说,安装 kubeadm 并不太复杂,当然中间也踩了不少坑, 不过后面都解决了。 后面要继续增加集群的话,直接按照 node 节点的操作,继续加入集群即可。
而且 kubeadm 的集群安装也越来越成熟了,基本上生产环境也是可以使用的,官方也很推荐用 kubeadm 的集群环境来作为 kubernetes 集群使用。 他对比二进制包安装简直方便太多,不过为了更好的理解 kubernetes 的,以达到更好的学习目的, 下一节我们尝试用二进制包的安装方式来安装 kubernetes 的集群环境。
参考资料: