前言
前段时间有用户反馈我们的一个服务有问题, 查了一下,发现我们的一个 wss 的长连接服务被挡掉, 后面原因是因为这个 wss 的长连接服务的端口因为不是常见端口,导致被有些公司内网的路由策略屏蔽掉了。 而如果是常见的 443 的 tls 端口的话, 大部分都是跟 80 一样默认开放的,也就不会有这些问题。
1 | C:\Users\Marco\Downloads\paping_1.5.5_x86_windows\paping_1.5.5_x86_windows>paping.exe 192.xx.xx.162 -p 9088 -c 4 |
而且还有遇到过 联通/电信的物联网卡的问题, 这种卡对 tls 加密通道以及对应走的端口其实是有限制的:
- 联通的物联网卡, 如果服务用的是 tls 加密的, 那么端口只能是 443, 但是他不需要强制要走 tls 加密通道
- 电信的物联网卡, 服务要强制走 tls 加密通道, 不过端口不会限制只能走 443。
但是问题来了,因为我们的这种 wss 的长连接服务比较多,有时候一个服务器就要部署好几个, 而一台服务器的 443 端口只能被一个程序接管, 如果这个 wss 程序接管了, 那么同一台服务器的另一个 wss 程序就无法接管了。
然后就想到我们的一台服务器同时部署多个 https API 服务, 然后统一由 nginx 这个程序来托管并代理 443 端口。 这样子就大家都可以用 443 端口的 https 服务了。 因此 wss 应该也是类似的。
所以我们本次实验要实现两个效果:
- 本地服务跑 http 服务, 然后 nginx 起 https 服务,代理并且转发到 本地的 http 服务
- 本地服务跑 ws 服务, 然后 nginx 起 wss 服务,代理并且转发到 本地的 ws 服务
如图所示:
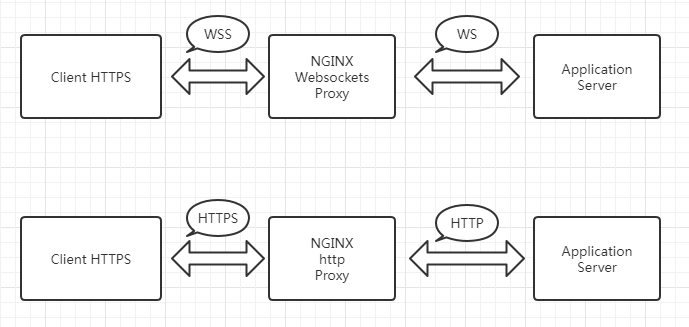
也就是本地的服务都不走 tls 加密的, 但是流量入口的 nginx 又是走 tls 加密, 然后请求进来,就会通过这个 nginx 的加密通道,转发到本地服务的不加密通道上。
1. 本地的 demo
这个 demo 其实就是实现本地的一个简单的 http 服务和一个 ws 服务。 用 golang 写的话,一个文件就搞定了 server.go1
2
3
4
5
6
7
8
9
10
11
12
13
14
15
16
17
18
19
20
21
22
23
24
25
26
27
28
29
30
31
32
33
34
35
36
37
38
39
40
41
42
43
44
45
46
47
48
49
50
51
52
53
54
55
56
57
58
59
60
61
62package main
import (
"flag"
"net/http"
"fmt"
"os"
"code.google.com/p/go.net/websocket"
)
var (
httpPort = flag.String("httpPort", ":8006", "http port")
wsPort = flag.String("wsPort", ":8007", "websocket port")
)
func main() {
fmt.Println("======start server!!")
go StartWs()
StartHttp()
}
func StartHttp() {
s := &http.Server{
Addr: *httpPort,
}
http.HandleFunc("/stat", SrvStatHandler)
fmt.Println(fmt.Sprintf("HttpListen(%v) start", *httpPort))
if err := s.ListenAndServe(); err != nil {
fmt.Println("Listen Http Server err,", err)
os.Exit(1)
}
}
func SrvStatHandler(w http.ResponseWriter, r *http.Request) {
fmt.Fprint(w, "==========http response ok=========")
}
func StartWs() {
http.Handle("/ws", websocket.Handler(wsHandle))
fmt.Println(fmt.Sprintf("wsListen(%v) start", *wsPort))
if err := http.ListenAndServe(*wsPort, nil); err != nil {
fmt.Println("ws ListenAndServe err,", err)
os.Exit(1)
}
}
func wsHandle(ws *websocket.Conn) {
var err error
for {
var reply string
if err = websocket.Message.Receive(ws, &reply); err != nil {
fmt.Println("Can't receive")
break
}
fmt.Println("Received back from client: " + reply)
msg := "Received: " + reply
fmt.Println("Sending to client: " + msg + "_server")
if err = websocket.Message.Send(ws, msg+"_server"); err != nil {
fmt.Println("Can't send")
break
}
}
}
测试一下, http 服务的话,直接 curl 即可:1
2[root@VM-0-13-centos ~]# curl 127.0.0.1:8006/stat
==========http response ok=========
ws 服务的话,我这边懒得再写客户端程序了,直接用线上的 test 站点来测试:
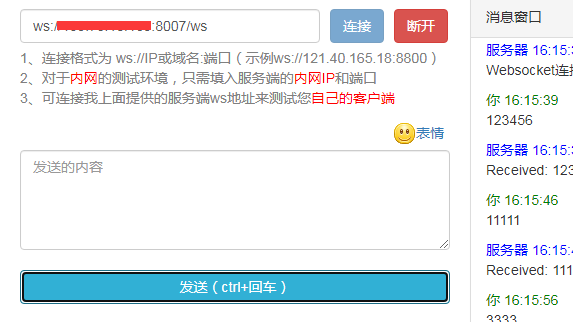
也是没问题的,不过要注意的是, 因为是外网访问,所以 8007 端口要对外网开放 (因为我是腾讯云服务器,所以直接在安全组开放这个端口,然后是 tcp 协议的)
这样子 demo 就完成了。
2. 安装 nginx
接下来就安装 nginx, 参照教程, 这边就不再细说
这样子 nginx 就安装好了, 不过还缺少证书, 所以我们要先生成 tls 证书,然后再配置 https 和 wss 转发
3. 自定义证书
1. nginx conf 目录创建 ssl 目录,并进入这个目录
1 | [root@VM-0-13-centos ~]# cd /usr/local/nginx/conf/ |
2. 创建服务器证书密钥文件 server.key
1 | openssl genrsa -des3 -out server.key 1024 |
具体:1
2
3
4
5
6
7[root@VM-0-13-centos ssl]# openssl genrsa -des3 -out server.key 1024
Generating RSA private key, 1024 bit long modulus
........++++++
..........................................................++++++
e is 65537 (0x10001)
Enter pass phrase for server.key:
Verifying - Enter pass phrase for server.key:
这边有个细节,就是这边要输入密码和确认密码, 如果你没有密码,可以设置一个, 类似于:1
2
3
4
5[root@VM-0-13-centos conf]# passwd root
Changing password for user root.
New password:
Retype new password:
passwd: all authentication tokens updated successfully.
然后就会在 ssl 目录下生成: server.key 这个文件1
2
3[root@VM-0-13-centos ssl]# ll
total 4
-rw-r--r-- 1 root root 951 Oct 21 17:07 server.key
3. 创建服务器证书的申请文件 server.csr
1 | openssl req -new -key server.key -out server.csr |
具体:1
2
3
4
5
6
7
8
9
10
11
12
13
14
15
16
17
18
19
20
21[root@VM-0-13-centos ssl]# openssl req -new -key server.key -out server.csr
Enter pass phrase for server.key:
You are about to be asked to enter information that will be incorporated
into your certificate request.
What you are about to enter is what is called a Distinguished Name or a DN.
There are quite a few fields but you can leave some blank
For some fields there will be a default value,
If you enter '.', the field will be left blank.
-----
Country Name (2 letter code) [XX]:cn
State or Province Name (full name) []:fujian
Locality Name (eg, city) [Default City]:xiamen
Organization Name (eg, company) [Default Company Ltd]:
Organizational Unit Name (eg, section) []:
Common Name (eg, your name or your server's hostname) []:
Email Address []:kebingzao@gmail.com
Please enter the following 'extra' attributes
to be sent with your certificate request
A challenge password []:
An optional company name []:
大部分都可以不填,直接一路空格下来。 然后这时候就会在 ssl 目录生成 server.csr:1
2
3
4[root@VM-0-13-centos ssl]# ll
total 8
-rw-r--r-- 1 root root 664 Oct 21 17:09 server.csr
-rw-r--r-- 1 root root 951 Oct 21 17:07 server.key
4. 去除文件口令
这时候可以先备份一份服务器密钥文件:1
[root@VM-0-13-centos ssl]# cp server.key server.key.org
接下来去除文件口令:1
2
3[root@VM-0-13-centos ssl]# openssl rsa -in server.key.org -out server.key
Enter pass phrase for server.key.org:
writing RSA key
5. 最后生成证书文件 server.crt
最后生成证书文件 server.crt:1
openssl x509 -req -days 365 -in server.csr -signkey server.key -out server.crt
具体:1
2
3
4[root@VM-0-13-centos ssl]# openssl x509 -req -days 365 -in server.csr -signkey server.key -out server.crt
Signature ok
subject=/C=cn/ST=fujian/L=xiamen/O=Default Company Ltd/emailAddress=kebingzao@gmail.com
Getting Private key
这时候在 ssl 目录下,就有这四个文件:1
2
3
4
5
6[root@VM-0-13-centos ssl]# ll
total 16
-rw-r--r-- 1 root root 875 Oct 21 17:10 server.crt
-rw-r--r-- 1 root root 664 Oct 21 17:09 server.csr
-rw-r--r-- 1 root root 887 Oct 21 17:10 server.key
-rw-r--r-- 1 root root 951 Oct 21 17:10 server.key.org
其中 server.crt 和 server.key 就是我们要在 nginx 上配置的 ssl 证书了
3. nginx 配置 https 请求
证书好了,我们就可以配置 https server 了1
2
3
4
5
6
7
8
9
10
11
12
13
14
15
16
17
18
19
20
21
22
23
24
25
26
27
28
29
30
31
32
33
34
35
36
37
38
39
40
41
42
43
44
45[root@VM-0-13-centos conf]# cat nginx.conf
worker_processes 1;
events {
worker_connections 1024;
}
http {
include mime.types;
default_type application/octet-stream;
sendfile on;
keepalive_timeout 65;
server {
listen 80;
server_name localhost;
location / {
root html;
index index.html index.htm;
}
location = /50x.html {
root html;
}
location = /hello {
return 200 'hello zach';
}
}
# HTTPS server
server {
listen 443 ssl;
server_name localhost;
ssl_certificate ssl/server.crt;
ssl_certificate_key ssl/server.key;
ssl_session_cache shared:SSL:1m;
ssl_session_timeout 5m;
ssl_ciphers HIGH:!aNULL:!MD5;
ssl_prefer_server_ciphers on;
location / {
root html;
index index.html index.htm;
}
}
}
默认的配置都没有变,只在最下面补上这一个 https server (这边为了更好的区分, 因此将 http 和 https 的 server 分开), 然后 reload nginx:1
[root@VM-0-13-centos conf]# sudo systemctl reload nginx.service
接下来用 curl 试一下,因为是自制证书,所以肯定会有安全提醒,所以补上 --insecure 参数:1
2
3
4
5
6[root@VM-0-13-centos nginx-1.18.0]# curl https://127.0.0.1 --insecure
<!DOCTYPE html>
<html>
<head>
<title>Welcome to nginx!</title>
...
说明 https 服务配置成功了。
4. nginx 配置转发 https 请求
接下来就配置一下转发 https 的请求, 将其转发到本地服务的 8006 端口, 修改配置文件:1
2
3
4
5
6
7
8
9
10
11
12
13
14
15
16
17
18
19
20
21
22
23
24
25
26server {
listen 443 ssl;
server_name localhost;
ssl_certificate ssl/server.crt;
ssl_certificate_key ssl/server.key;
ssl_session_cache shared:SSL:1m;
ssl_session_timeout 5m;
ssl_ciphers HIGH:!aNULL:!MD5;
ssl_prefer_server_ciphers on;
location / {
root html;
index index.html index.htm;
}
location = /stat {
proxy_pass http://localhost:8006;
proxy_set_header Host $host;
proxy_set_header X-real-ip $remote_addr;
proxy_set_header X-Forwarded-For $proxy_add_x_forwarded_for;
}
}
只增加下面的这个 /stat 请求, 这个路由也是本地服务的 http 服务的路由, 然后转发到 local 服务的 8006 端口。 然后看下效果:1
2
3
4[root@VM-0-13-centos conf]# sudo systemctl reload nginx.service
[root@VM-0-13-centos conf]# curl https://127.0.0.1/stat --insecure
==========http response ok=========
非常完美,没有任何问题。
5. nginx 配置转发 wss 请求
接下来试下用 wss 代理 本机服务的 ws, 修改配置文件1
2
3
4
5
6
7
8
9
10
11
12
13
14
15
16
17
18
19
20
21
22
23
24
25
26
27
28
29
30
31
32
33
34
35
36
37
38
39
40
41
42
43
44
45map $http_upgrade $connection_upgrade {
default upgrade;
'' close;
}
server {
listen 443 ssl;
server_name localhost;
ssl_certificate ssl/server.crt;
ssl_certificate_key ssl/server.key;
ssl_session_cache shared:SSL:1m;
ssl_session_timeout 5m;
ssl_ciphers HIGH:!aNULL:!MD5;
ssl_prefer_server_ciphers on;
location / {
root html;
index index.html index.htm;
}
location = /stat {
proxy_pass http://localhost:8006;
proxy_set_header Host $host;
proxy_set_header X-real-ip $remote_addr;
proxy_set_header X-Forwarded-For $proxy_add_x_forwarded_for;
}
location = /ws {
proxy_pass http://localhost:8007;
proxy_read_timeout 300s;
proxy_send_timeout 300s;
proxy_set_header Host $host;
proxy_set_header X-real-ip $remote_addr;
proxy_set_header X-Forwarded-For $proxy_add_x_forwarded_for;
proxy_http_version 1.1;
proxy_set_header Upgrade $http_upgrade;
proxy_set_header Connection $connection_upgrade;
}
}
也是补了最下面的 /ws 这个路由,注意该路由要跟本地服务的 ws 服务的路由一致, 同时了为了更优雅,用 map 指令组合成新的变量。
而这个 map 的作用主要是根据客户端请求中 $http_upgrade 的值,来构造改变 $connection_upgrade 的值,即根据变量 $http_upgrade 的值创建新的变量 $connection_upgrade,创建的规则就是 {} 里面的东西,所以规则就是:
- 如果
$http_upgrade没有匹配,那 “Connection” 头字段的值会是upgrade。 - 如果
$http_upgrade为空字符串的话,那 “Connection” 头字段的值会是 close。
然后解释一下关键配置, 最重要的就是在反向代理的配置中增加了如下两行,其它的部分和普通的HTTP反向代理没有任何差别。
1 | proxy_set_header Upgrade $http_upgrade; |
这里面的关键部分在于HTTP的请求中多了如下头部:1
2Upgrade: websocket
Connection: Upgrade
这两个字段表示请求服务器升级协议为WebSocket。这时候状态码是 101, 表示协议升级, 服务器处理完请求后,响应如下报文:1
2
3HTTP/1.1 101 Switching Protocols
Upgrade: websocket
Connection: upgrade
告诉客户端已成功切换协议,升级为 Websocket协议。握手成功之后,服务器端和客户端便角色对等,就像普通的Socket一样,能够双向通信。 不再进行HTTP的交互,而是开始WebSocket的数据帧协议实现数据交换。
这里使用map指令可以将变量组合成为新的变量,会根据客户端传来的连接中是否带有Upgrade头来决定是否给源站传递Connection头, 这样做的方法比直接全部传递upgrade更加优雅。
默认情况下,连接将会在无数据传输60秒后关闭,proxy_read_timeout 参数可以延长这个时间。 源站通过定期发送 ping 帧以保持连接并确认连接是否还在使用。 所以我们可以根据实际场景来设置默认关闭事件.
proxy_read_timeout
语法 proxy_read_timeout:
- time -> 默认值 60s
- 上下文 -> http server location
- 说明 -> 该指令设置与代理服务器的读超时时间。
它决定了nginx会等待多长时间来获得请求的响应。 这个时间不是获得整个 response 的时间,而是两次 reading 操作的时间。
proxy_send_timeout
语法 proxy_send_timeout:
- time -> 默认值 60s
- 上下文 -> http server location
- 说明 -> 这个指定设置了发送请求给upstream服务器 (源程序)的超时时间。
超时设置不是为了整个发送期间,而是在两次 write 操作期间。 如果超时后,upstream 没有收到新的数据,nginx 会关闭连接
ps: 如果你的源程序已经有对 读超时 和 写超时 做了判断逻辑, 原则上 nginx 这边可以设置的大一点,比如 1800s, 让其全部由源程序来判断。 当然这个得根据具体场景来设置。
最后重启 nginx, 看下效果
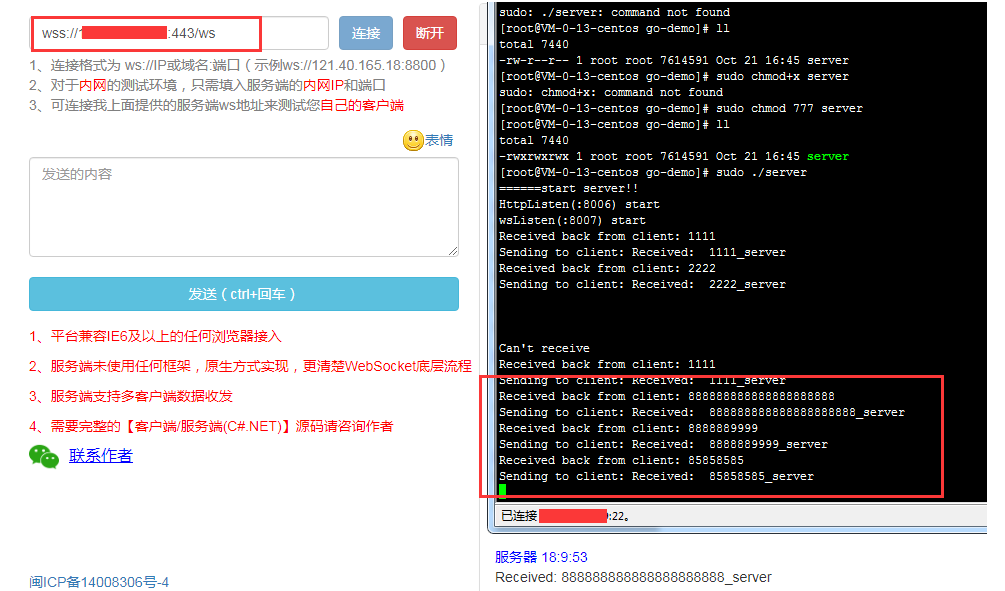
可以看到有转发到本地服务的 ws 服务了。 而且用 nginx 来代理转发 wss 也有一个好处,就是可以在请求的 access log 和 error log 看 request, 就不需要每次看 access request 的时候,都要去查源程序的业务日志了:1
2
3access_log /var/log/nginx/example.com.access.log main;
access_log /var/log/nginx/example.com.4xx5xx.log combined if=$loggable;
error_log /var/log/nginx/example.com.error.log warn;
总结
nginx 确实可以转发代理 wss 服务。 而且转发本地的服务都不需要用到 tls 加密了。 nginx 那边加密就行了。
如果是 多个 websocket 服务的话, 也是一样的, 反正就是直接让 nginx 去做转发。 针对不同的路由进行转发即可。
如果是同一台服务器的多个域名的多个 websocket 服务的话, 也是一样的, 因为 nginx 本来就支持多个域名的配置,一个域名就是一个单独的 nginx config 配置。
不过需要注意一点的是, 因为是用 nginx 代理, 而 nginx 关于 ssl 模块也有一些配置项, 这个就涉及到高并发下的性能优化了。
不仅仅原程序下的并发性能优化要做好, nginx 下的并发也要处理好。 尤其是这几个参数:
1 | ssl_protocols TLSv1 TLSv1.1 TLSv1.2; |
接下来我们结合一下他的官网,来讲一下这几个参数: Module ngx_http_ssl_module
ssl_protocols
1 | Syntax: ssl_protocols [SSLv2] [SSLv3] [TLSv1] [TLSv1.1] [TLSv1.2] [TLSv1.3]; |
所支持的 tls 的版本, 如果要用 tlsv1.1 和 tlsv1.2 的话,那么 openssl 要 1.0.1 版本或者更好, 如果要使用 tlsv1.3, 那么 openssl 就要 1.1.1 或者更高。
ssl_ciphers
1 | Syntax: ssl_ciphers ciphers; |
所支持的 tls 的加密套件,以 OpenSSL 库理解的格式指定。可以使用 openssl ciphers 命令查看完整列表
ssl_prefer_server_ciphers
1 | Syntax: ssl_prefer_server_ciphers on | off; |
是否由服务器决定采用哪种加密算法, 默认是 off, 但是如果ssl协议支持 tlsv1 tls1.1 这种老协议,设置为 on ,并配合 ssl_ciphers 使用, 如果ssl协议只支持 tlsv1.2 tlsv1.3 新协议,设置为 off (nginx 默认为off),因为新协议不再采纳此参数
ssl_session_timeout
1 | Syntax: ssl_session_timeout time; |
指定客户端可以重用会话参数的时间(超时之后不可使用), 默认是 5 分钟 (5m),
ssl_session_cache
1 | Syntax: ssl_session_cache off | none | [builtin[:size]] [shared:name:size]; |
可以开启会话缓存复用,默认是 none,也就是轻度禁止使用会话缓存:nginx 告诉客户端会话可以重用,但实际上并不会将会话参数存储在缓存中。
启用 SSL Session 缓存可以大大减少 TLS 的反复验证,减少 TLS 握手的 roundtrip。虽然 session 缓存会占用一定内存,但是用 1M 的内存就可以缓存 4000 个连接,可以说是非常非常划算的。
他的缓存时间由ssl_session_timeout 决定,默认是5分钟,即客户端可以重用会话参数的时间。
1 | ssl_session_cache shared:SSL:50m; |
比如:共享50M内存,建议使用shared,而不是builtin。shared:所有 worker 进程之间共享的缓存。缓存大小以字节为单位指定,1M可以存储大约 4000 个会话。每个共享缓存都应有一个任意的名称。可以在多个虚拟服务器中使用有相同名称的缓存。
开启 https
开启http2,比起http1.1快了66%1
listen 443 ssl http2;
不过要开启 https, openssl 的版本必须在1.0.2e 及以上,在 Chrome 51 后,谷歌去掉了对 NPN 的支持,HTTP2 不能用了会证书错误,而openssl1.0.2e 之后的版本修复了此问题, 同时 nginx 还要加载一个额外的模块 --with-http_v2_module
nginx 转发的端口是有上限 (针对长连接的转发)
之前有针对 配置 nginx 转发之后的服务器进行压测, 发现加入了 nginx 之后, 虽然可以通过上述的 tls 优化,让其同一时刻的并发数比原先更高, 但是还有两个缺点:
- nginx 也要吃内存,本来原先的内存都是给程序吃的,但是现在加入了 nginx 转发之后, 在内存分配上,至少有 30% 要给 nginx
- 在测试长连接的最大可连接数的时候, nginx 是有可转发长连接上限的,是因为 nginx 作为反向代理时,为了支持长连接,nginx 也扮演了 websocket 服务的客户端角色,nginx 需要从本地申请新的端口发起连接到 websocket 服务,而系统分配从 local 发起请求的端口是有限制的,通常是 32768 到 60999,也就是 28232 个,所以这种 nginx local 转发代理的,最多只能保持 28232 个长连接,再多就会报
Cannot assign requested address这个错误
当然这个 ip_local_port_range 范围是可以在配置文件改的,默认是:1
2[root@VM-0-14-centos supervisor]# cat /proc/sys/net/ipv4/ip_local_port_range
32768 60999
我们可以调整为:1
echo 10000 60999 > /proc/sys/net/ipv4/ip_local_port_range
将其调整到 5w 个可分配端口。
参考资料: